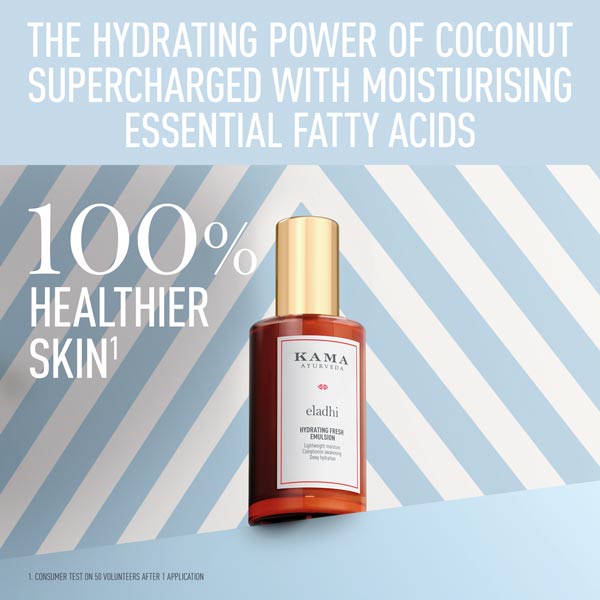
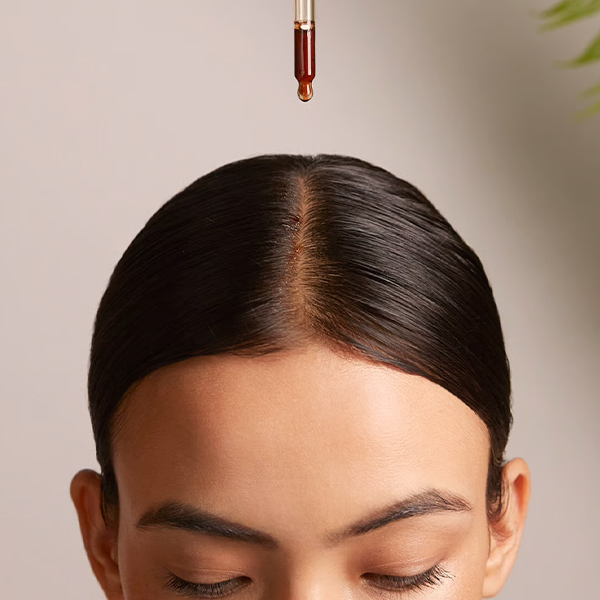
Oily and combination skin need hydration just as much as dry skin, sometimes even more. When the skin lacks moisture (dehydrated), it tends to produce more oil, which can lead to breakouts and dullness. What it really needs is a lightweight formula that balances and refreshes without clogging pores.
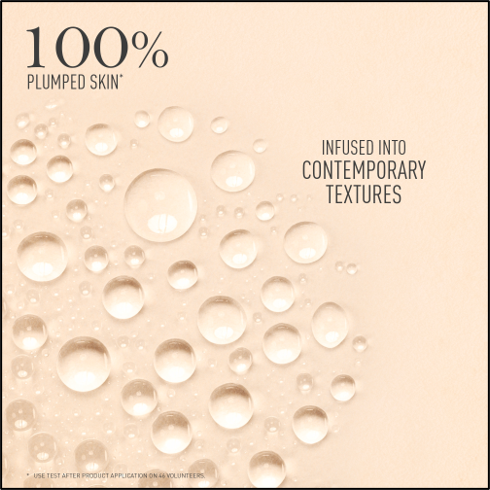
Kama Ayurveda’s Eladhi Hydrating Fresh Emulsion is exactly formulated for this purpose. It is oil-free, fast-absorbing, and clinically proven to deliver 100% instant hydration and improved skin texture, leaving the skin soft, fresh, and naturally glowing.
Why Even Oily Skin Needs Hydration?
Keeps oil in check:
When oily skin isn't properly hydrated, it goes into overdrive, producing even more sebum to compensate. Regular hydration helps regulate oil production and keeps your skin feeling fresh and comfortable, rather than greasy.
Strengthens your skin’s natural barrier:
Hydration supports the skin's lipid barrier, which protects the skin against pollution, UV rays, and other external stresses. A healthy lipid barrier locks in moisture and keeps irritants out.
Reduces redness and irritation:
Well-hydrated skin stays calm and resilient. It is less prone to inflammation, redness, or sudden breakouts that generally come from dehydration.
Smoothens texture and adds a healthy glow:
Moisture plumps up the skin, softens roughness, and brings back a natural radiance without adding shine. What one will get with this water masque is light, smooth, and balanced skin.
Helps maintain youthful skin:
Continuous hydration will keep the skin supple and avoid early signs of aging. It softens fine lines and helps maintain a naturally healthy, refreshed look.
Ayurvedic Botanicals That Balance Oil and Hydration
Ayurveda believes that balance is the key to healthy skin. For oily and combination skin, this means managing excess sebum without stripping away essential moisture. Here are some age-old botanicals that help purify, soothe, and restore natural balance to the skin.
Calendula:
This plant extract cools redness and makes the skin retain moisture. It aids in the repair of the skin and makes it feel soft and comfortable.
Coconut:
It nourishes the skin with its healthy lipids that keep skin moisturized but not greasy. It keeps skin smooth and balanced in texture.
Beetroot Extract:
It attracts moisture and locks it in to maintain fresh, hydrated, and plump skin throughout the day.
Calamus:
Known in Ayurveda for its cleansing and soothing qualities, it helps control excess oil and keeps the skin balanced.
Aloe Vera:
It cools and moisturizes the skin, aiding it in recovering from sun exposure, redness, or irritation. It supports natural healing.
Cucumber:
Cools and tones the skin by tightening pores. It is rich in water and vitamin C, helping to keep your skin calm and hydrated.
Peppermint:
It acts as a natural astringent that balances oil levels. It cools and refreshes the skin, reducing further inflammation.
Why Choose Eladhi Hydrating Fresh Emulsion for Oily Skin
Kama Ayurveda’s new Eladhi Hydrating Fresh Emulsion delivers instant freshness and a dewy glow with its light, refreshing formulation designed especially for oily and combination skin. Made with 35 Ayurvedic botanicals, this emulsion sinks smoothly into the skin to give you balanced and natural radiance.
The formula combines time-tested ingredients that care for oily skin at every level. Coconut replenishes essential lipids and keeps the skin moisturized without feeling greasy. Cardamom, rich in antioxidants, helps brighten the complexion and protect it from daily damage. Calendula calms irritation and redness while preventing moisture loss, keeping the skin smooth and comfortable. Beetroot extract adds a fresh boost of hydration, helping the skin stay plump, clear, and refreshed throughout the day.
Light and breathable, this oil-free emulsion helps control excess sebum while strengthening the skin’s natural barrier. With regular use, it restores suppleness, improves texture, and leaves the skin looking healthy and balanced.
Clinically tested results:
100% experienced instant hydration
100% improved skin texture
40% improvement in skin hydration with regular use
If you’re looking for a gentle Ayurvedic moisturizer for oily skin, Eladhi Hydrating Fresh Emulsion offers the perfect balance of lightness and nourishment, keeping your skin calm, clear, and beautifully glowing.
For oily skin, Eladhi Hydrating Fresh Emulsion is the ideal choice. Light and non-greasy, it's enriched with 35 Ayurvedic botanicals that keep skin fresh, balanced, and hydrated through the whole day.
How to choose a moisturizer for oily skin?
Choosing the best lightweight moisturizer for oily skin isn’t as tough as you think. Just remember these three things: it should be lightweight, oil-free, and non-comedogenic to keep the skin hydrated without clogging pores. Ayurvedic ingredients like calendula, cardamom, and coconut work best for balanced, shine-free skin.
Is Eladhi Hydrating Fresh Emulsion non-comedogenic?
Yes, it is non-comedogenic, and it is designed for oily or combination skin. It absorbs quickly, controls excess sebum, and keeps pores clear while maintaining smooth hydration.
Can I use it under makeup?
Yes, it's perfect under makeup. The feather-light texture forms a smooth, hydrated base that helps the foundation glide on smoothly and stay fresh longer.
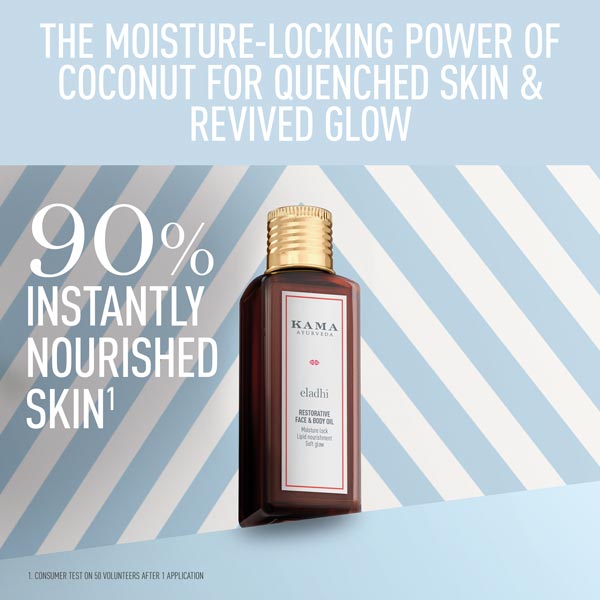
Skin that’s truly nourished always glows.” But in India, our skin faces countless challenges, blazing summers, dry winters, pollution, and long hours in air-conditioned spaces, all of which strip away its natural moisture. Ordinary moisturizers can only do so much. What your skin truly craves is gentle, nourishing care that works deeply to restore balance and vitality.
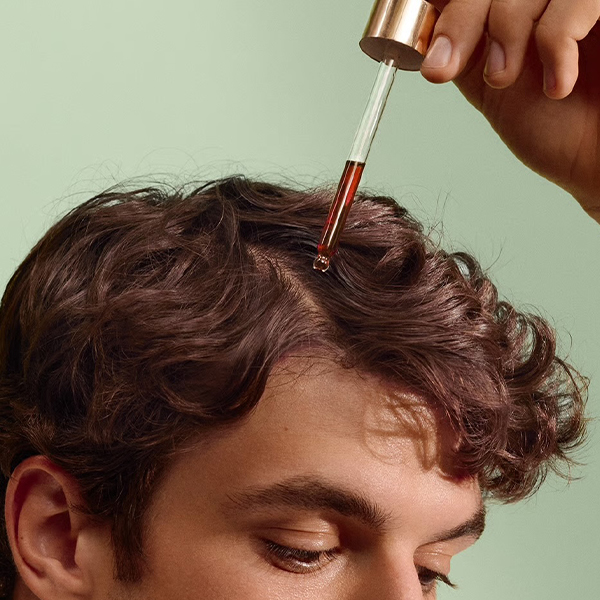
Eladhi Restorative Face & Body Oil from Kama Ayurveda is made exactly for this. Enriched with age-loved Ayurvedic ingredients, it penetrates deeply to hydrate, strengthen your skin’s natural barrier, and reveal a soft, radiant glow that feels nourished from within.
Before we talk about Ayurvedic oils for glowing skin, let’s first answer a basic question: why does your skin lose moisture[VS2] ? Here are some common causes:
Environmental Stress:
Exposure to the sun, pollution, and dry winters can take away natural moisture from the skin. Long hours in air-conditioned places further weaken the protective barrier of the skin, which leaves it dry, rough, and sensitive.
Seasonal Changes:
Skin hydration varies according to the seasons. Cold, dry winters diminish natural oils and lipids, making the skin easily succumb to dryness, while hot summers can increase both sweat and the rate of water loss.
Aging:
With aging, natural water-binding molecules, such as hyaluronic acid, are reduced, and lipid levels are lowered. This decreased ability to retain moisture in the skin causes dry skin and a dull appearance.
Nutritional Deficiencies:
These include deficiencies in vitamin C, calcium, and essential fatty acids. All these can affect the skin's capability of retaining moisture. Good nutrition helps the skin barrier and will keep it soft and elastic.
Glycation & Sugar Intake:
Consuming excess sugar might alter proteins in the skin and make the skin less supple. These changes, known as glycation, reduce hydration and elasticity, which lead to dryness and early signs of aging.
What Makes Ayurvedic Oils So Effective for Deep Nourishment?
Deep Nourishment from Within
Ayurvedic oils nourish the skin deeply because they are made with natural, plant-based ingredients that work from within. They don't just coat the surface but are absorbed slowly, allowing the skin to drink deeply in what it needs to feel soft, supple, and healthy.
Herbs and Botanicals That Heal and Restore
These oils are enhanced with herbs, essential oils, and traditional botanicals used for centuries in India to support the health of the skin. Every ingredient is selected with care to soothe, repair, and restore balance, leaving skin radiant.
Strengthening the Skin’s Natural Barrier
Regular use of Ayurvedic oils for dry skin fortifies the skin's natural barrier. This means the skin retains moisture longer, resists dryness, and recovers much better from environmental stress. Over time, skin feels and looks smoother, firmer, and naturally luminous.
Beyond simple hydration, these oils work to improve overall skin vitality: making it more elastic, reducing roughness, and generally helping the skin look radiant. The effects are cumulative, lending the skin a well-nourished and cared-for appearance that ordinary moisturizers simply can't provide.
Rooted in Centuries of Ayurvedic Science
The effects of Ayurvedic oils are rooted in tradition and experience that spans centuries. Every ingredient and each blend is specifically designed to support skin in a holistic way, offering long-lasting health and radiance rather than temporary relief.
Ayurvedic oils go beyond simple hydration. They work deeply to restore the skin’s balance, improve texture, and reveal a natural, luminous glow. Kama Ayurveda’s Eladhi Restorative Oil beautifully combines traditional Ayurvedic science with modern care, leaving the skin nourished, soft, and radiant.
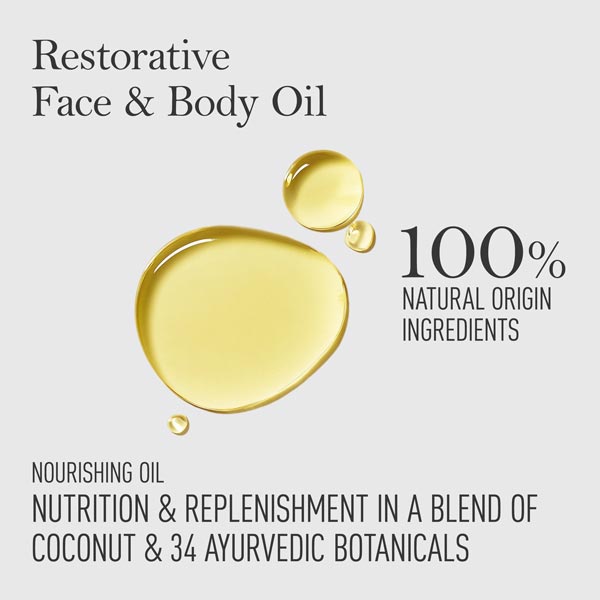
Ingredients and Clinical Validation of Eladhi Oil
Eladhi Restorative Oil is a carefully formulated blend of 35 Ayurvedic botanicals, each selected for the benefits it brings to the skin. Coconut nourishes and restores lipids, Cardamom provides antioxidant protection, and Rose soothes and calms. Together, they work to hydrate, restore balance, and leave the skin feeling cared for.
The oil is grounded in Ayurvedic tradition and also tested for effectiveness. Studies show that it boosts skin hydration and strengthens the skin’s natural barrier, delivering visible results in just a few weeks.
Here’s what users experienced:
31% increase in skin hydration within 14 days
19% improvement in skin barrier strength
90% felt instant nourishment
94% noticed softer, smoother skin
86% saw healthier, more radiant skin after just one use
For anyone seeking the best Ayurvedic oil for face and body in India, Eladhi Restorative Oil combines centuries of wisdom with proven results, leaving the skin soft, nourished, and naturally radiant.
How to Use Face and Body Oil for Glowing Skin: Step-by-Step Guide
Wash your body with a gentle Ayurvedic body wash and cleanse your face with a mild Ayurvedic face cleanser to remove makeup, dust, and excess oil without stripping your skin of moisture. Use warm water to open the pores, which helps the oil absorb better.
Pat your skin lightly with a towel, leaving it slightly damp. This allows the oil to lock in moisture more effectively.
Pour a few drops of Eladhi Restorative Oil into your palms and warm it slightly between your hands. Massage it gently over your face and body using upward strokes.
Spend a little extra time on areas like your arms, legs, and shoulders to boost circulation and promote relaxation.
For a subtle, luminous glow, mix a drop of the oil with your foundation or body lotion and apply it over arms, legs, or any area you wish to highlight.
Make this ritual a daily habit, preferably after your shower, to keep your skin soft, nourished, and naturally radiant over time.
Eladhi Restorative Oil is one of the best Ayurvedic oils for glowing skin in India. It deeply nourishes with ingredients like coconut, cardamom, rose, and other botanicals, leaving the skin soft, healthy, and radiant.
Can I use Eladhi Oil on my face daily?
Yes, it can be used daily on damp skin to lock in moisture and keep the skin nourished and smooth.
Ayurvedic Body Oil vs Moisturizer: Which Is Better for Your Skin?
Ayurvedic body oil and body moisturizer work best together. The oil nourishes and restores the skin, while a moisturizer locks in hydration, keeping skin soft, healthy, and glowing.
Is it suitable for oily skin?
Yes, it absorbs quickly without feeling greasy, making it suitable for all skin types, including oily skin.
The holistic principles of Ayurveda, including lifestyle practices, traditional remedies, and innovative tools, have long been valued for their role in supporting strong, healthy hair. This guide explores Ayurveda’s ancient approach to haircare and shares practical ways to enhance strength, shine, and vitality.
Ayurvedic Insights on Hair Health
Hair as a Reflection of Inner Health
Ayurveda has always treated hair as more than an accessory of beauty. It is seen as a reflection of inner health, balance, and vitality. In India, where the tradition of Ayurvedic haircare runs deep, practices such as oiling, mindful nutrition, and stress management are not passing trends. They are deeply rooted rituals that have been followed for centuries. Today, with growing interest in natural beauty in India, these ancient insights feel more relevant than ever.
According to Dr. Vijay Murthy, Global Scientific Expert at Kama Ayurveda, hair, teeth, and nails are considered by-products of bone tissue in Ayurveda. “For healthy hair, it is essential that our digestion, absorption, agni (digestive fire), and detoxification processes are functioning optimally,” he notes. “Bones are among the last tissues to develop, so ensuring that nutrients reach these deeper layers is key to hair health.”
From a Western biological standpoint, hair is classified as dead tissue, but in Ayurveda, it is viewed as a visible extension of the bones. As Dr. Murthy says,
“If you want to know the state of someone’s bones, look at their hair.”
Lifestyle and Stress
This philosophy makes lifestyle and nutrition central to hair vitality. Stress, which disturbs the nervous system and doshas, is one of the biggest contributors to hair fall, hair thinning, premature greying, and loss of shine. Practices such as yoga, meditation, and pranayama breathing calm the mind and protect the body from stress-induced imbalances that weaken hair over time.
Nutrition
Nutrition is equally important, and a balanced diet is crucial for maintaining vibrant hair. Ayurveda recommends foods that balance Pitta and nourish deeper tissues, such as:
· Leafy greens
· Citrus fruits and berries
· Okra (ladyfinger)
· Melons - hydrating, mineral-rich, easy to digest, and supportive of deeper tissue nourishment
· Amla (Indian gooseberry) - a potent superfood that supports growth, strengthens roots, and restores shine, whether consumed or applied in treatments
Dr. Murthy also suggests prioritizing alkalizing foods (those that become alkaline after digestion), as they help balance digestion and support both bone and hair health.
Topical Care and Oiling
Topical care complements this inner balance. The scalp’s superficial tissues, much like the skin, are highly receptive to nutrients, which is why Ayurveda has long emphasized the ritual of oiling. Regular use of oils infused with potent herbs strengthens roots, calms the scalp, and restores natural shine. Kama Ayurveda’s Bringaras Invigorating Scalp & Hair Oil, inspired by the traditional Bringadi ritual, combines Bhringaraj, Indigo, and Balloon Vine to deeply nourish the scalp. Clinically proven to boost scalp nourishment by 50% instantly and improve strength by 20%, it addresses common concerns, including hair fall, dandruff, dryness, and premature greying.
Bhringaraj, often called the King of Hair, offers powerful antimicrobial and antifungal benefits, making it one of Ayurveda’s most effective herbs for restoring scalp balance, promoting hair growth, and imparting a natural, silky sheen to the hair.
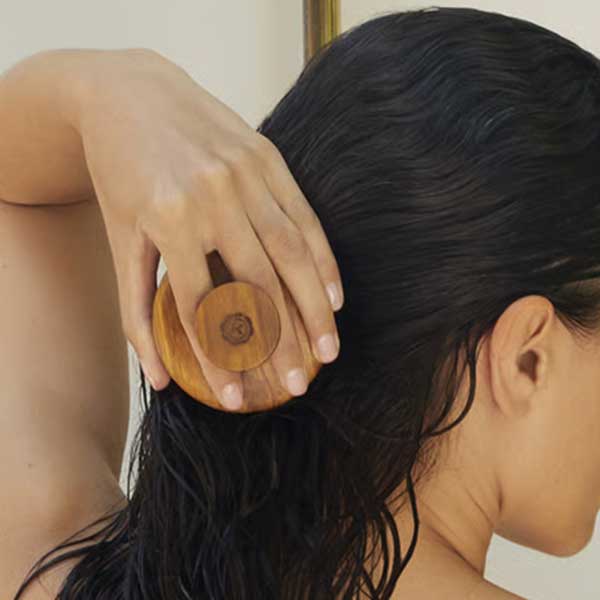
Tools & Touch in Haircare
Ayurveda also values tools and touch as part of haircare, recommending regular brushing to stimulate blood flow at the roots. The Kansa Scalp Massage Brush, a modern adaptation of an ancient practice, enhances circulation, improves absorption of oils, and relieves tension.
With bristles centered around a kansa metal dome made of copper and tin, the brush helps detoxify the scalp, supports oxygen absorption, and provides a calming, grounding effect, turning haircare routine into a mindful, stress-relieving ritual.
A Complete Ayurvedic Hair Ritual
A balanced haircare routine combines both inner and outer nourishment:
· Weekly oil massages
· Regular hair brushing · Gentle cleansing with natural shampoos
· Avoiding over-washing or using products laden with harsh chemicals
Together, these practices nurture scalp health, strengthen roots, and transform the quality of hair, leaving it strong, glossy, and resilient.
Ayurveda’s Long-Term Approach
In a world filled with chemical-laden products and quick fixes, Ayurveda stands apart. It addresses not just the symptoms of hair concerns but also the root causes, offering long-term solutions that are both effective and holistic.
Healthy hair is not built overnight. It comes from consistent care, balance, and respect for your body’s natural rhythms. Ayurveda teaches that beauty begins from within, and by following these principles, you can strengthen your hair and restore harmony to both mind and body.
Luxury haircare in India is undergoing a quiet revolution, one that draws inspiration from age-old traditions to create tools for modern beauty rituals. At the heart of this change is the Kansa Brush, Kama Ayurveda’s latest innovation, which brings together centuries of Ayurvedic healing practices with the needs of today’s wellness-conscious consumer.
What Makes the Kansa Brush Unique?
Unlike ordinary scalp brushes, the Kansa Brush is inspired by Ayurveda’s therapeutic tradition of metals.
· Its bristles are arranged around a dome made of kansa, a sacred alloy of copper and tin revered for its detoxifying and healing properties.
· In Ayurveda, metals are not passive but are active conductors of energy (they are believed to transmit energy within the body).
· The Kansa dome helps stimulate circulation, awaken hair follicles, and gently detoxify the scalp, making it a powerful tool for both beauty and balance.
Dr. Vijay Murthy, Global Scientific Expert at Kama Ayurveda, explains:
“From an Ayurvedic perspective, the scalp is where prana, or life force, enters our system. Kansa metal acts as a conductor, subtly activating pranic energy, which enhances oxygen absorption and improves cellular oxygenation.”
Every stroke of the brush does more than improve scalp comfort. It also boosts vitality at a cellular level.
Benefits of Regular Use
· Healthier, Fuller Hair:
Regular use of the Kansa Brush enhances blood circulation to the roots, ensuring that essential nutrients reach the hair follicles and supporting healthier, fuller-looking hair.
· Stress Relief and Energy Balance:
The scalp contains several vital marma points, and massaging them with the Kansa Brush has a calming, reflexology-like effect. This helps reduce stress, release tension, and rebalance energy systems, addressing issues such as hair fall, premature graying, and thinning. At a time when stress is one of the leading causes of hair damage, this ritual becomes as much a form of self-care as it is haircare.
· Enhanced Oil Absorption: When paired with Kama Ayurveda’s Bringaras Scalp & Hair Oil, the Kansa Brush transforms the traditional oiling ritual into a luxurious haircare experience. The brush distributes oil evenly across the scalp and strands while enhancing absorption and ensuring that the benefits of Bhringaraj, Indigo, and Balloon Vine reach deep into the roots. With regular use, this combination restores balance, strengthens hair, and promotes long-term scalp health.
· A Holistic Ritual:
Even on dry hair, the Kansa Brush can be used as a grounding ritual at the end of a long day, helping to ease mental fatigue and quiet the mind. With its sacred metal composition, antimicrobial properties, and therapeutic value, it becomes more than a tool. It is a ritual of renewal for both hair and overall well-being.
3 Ways to Use the Kansa Brush
● Hair-Oiling Boost:
After applying Bringaras Scalp & Hair Oil, use the Kansa Brush to distribute the oil evenly from roots to the ends. Massage the scalp in circular motions for about 5 minutes to promote blood flow to the hair follicles and enhance the oil’s effectiveness.
● Scalp Exfoliation:
Use the brush as a gentle exfoliator to detox the scalp, remove product buildup, and lift impurities.
● Mind Relaxation:
Whenever needed, gently massage your dry scalp with the Kansa Brush to relieve tension and calm the mind.
With its unique composition of sacred metal, antimicrobial properties, and therapeutic value, the Kansa Brush is a ritual of renewal. As Ayurveda continues to shape the future of luxury beauty and wellness in India, the Kansa Brush stands out as an invitation to slow down, reconnect, and care for yourself in a way that feels both timeless and deeply modern.
Some herbs quietly exist in the background of Ayurveda, while others, like Bhringaraj (False Daisy), have earned their crown. Revered for centuries as the “King of Hair”, this humble green thrives in India’s wetlands and has been celebrated in Ayurvedic texts for its ability to strengthen roots, delay graying, and revive thinning strands. Today, it remains one of the most trusted ingredients in natural haircare in India, valued not only by tradition but also by modern science.
The 'King of Hair'
In Sanskrit, Bhringaraj is known as Kesharaj, which literally translates to “ruler of hair.” The name isn’t poetic but earned. This herb is renowned for its ability to:
· Deeply nourish the scalp
· Strengthen follicles
· Restore shine
Modern life, however, constantly challenges scalp health. Stress, pollution, and imbalance in the Pitta and Vata doshas often lead to premature graying , breakage, and excessive hair fall.
Bhringaraj’s natural richness, including phytonutrients, flavonoids, and anti-inflammatory compounds, helps counter these effects by:
· Calming an irritated scalp
· Improving blood circulation
· Preventing dandruff
· Restoring resilience to tired, stressed hair
A Holistic Approach to Hair and Wellness
Ayurvedic medicine emphasizes the power of combining herbs for maximum effect. At Kama Ayurveda, we blend Bhringaraj with other potent herbs such as Balloon Vine and Indigo, which are rich in antioxidants. This combination forms the key ingredient in our signature Bringaras Scalp & Hair Oil, as well as the Bringaras Shampoo & Conditioner. Benefits of regular use include:
· Supporting overall hair health
· Improving scalp blood circulation
· Alleviating tension throughout the body
One of Ayurveda’s core philosophies is synergy, where herbs work better together. In the Bringaras range, Bhringaraj strengthens roots and nourishes, Indigo soothes the scalp, and Balloon Vine balances and protects. Together, these herbs form a complete ritual of haircare products, including oils, shampoos, conditioners, serums, and masks, formulated to support hair growth, scalp balance, and long-term strength.
Regular use of Bringaras Scalp & Hair Oil:
· Improves scalp circulation
· Strengthens roots
· Brings visible shine
· Reduces hair fall and breakage
· Delays premature graying · Soothes irritation and prevents dandruff
· Adds softness and smoothness to strands
· Nourishes and revitalizes tired, stressed hair
It’s a ritual that transforms hair and calms the mind.
More Than Just Beauty: A Natural Healer
Bhringaraj is often called an anti-aging herb because of its benefits for hair, skin, and internal organs. It is a rich source of magnesium, which helps:
· Soothe the nervous system
· Reduce muscle tension
· Ease headaches
· Promote deeper, more restful sleep
When taken as a supplement, Bhringaraj has additional health benefits:
· Aid in liver detoxification
· Improve vision (thanks to high beta-carotene content)
· Fight harmful microbes and parasites
Purify the blood and assist in toxin breakdown
A Modern Ritual with Ancient Roots
To experience Bhringaraj the way it was meant to be, turn your haircare routine into a ritual. Warm a few drops of Bringaras Scalp & Hair Oil in your palms, massage it slowly into the scalp, and let the herb do its work. The act itself is as restorative as the oil, releasing tension, grounding your thoughts, and nourishing your roots all at once.Follow with the Bringaras Balancing Shampoo and Conditioner for daily freshness, or indulge in the Bringaras Hair Mask weekly for repair. To finish, smooth on the Bringaras Shine Serum, a modern Ayurvedic solution for instant gloss and heat protection.
All Hail the King of Hair
Bhringaraj has stood the test of time not just because it works, but because it brings balance to scalp, hair, and spirit. In an age where Ayurvedic beauty in India is regaining center stage, Bhringaraj proves why some rituals should never be forgotten. At Kama Ayurveda, we’ve reimagined this legendary herb in the Bringaras collection, a ritual for stronger roots, glossier strands, and a scalp that feels nourished, balanced, and alive.
Inspired by 2,000 years of Ayurveda, hair oiling has been at the heart of Indian beauty rituals. For generations, women and men have turned to this practice to nurture strong, glossy hair and a healthy scalp. Today, as the world embraces traditional self-care, this ancient ritual is reclaiming its place in India’s natural haircare scene.
Why Hair Oiling is Essential for Hair and Scalp Health
When you infuse your scalp with the nourishing power of Ayurvedic oils, the benefits go far beyond shine. Regular hair oiling:
· Stimulates blood circulation
· Strengthens hair follicles
· Delivers vital nutrients directly to the roots These actions help reduce hair fall, slow premature greying, prevent dandruff, and minimize split ends without the harshness of chemical-heavy products.
Beyond beauty, the ritual itself is deeply restorative. The act of massaging oil into the scalp eases tension in the head, neck, and shoulders, relieving headaches, reducing stress, and even promoting better sleep. Ayurveda teaches that the scalp holds vital marma points (energy centers), making oiling both therapeutic and rejuvenating.
The Tradition of Sneha: Hair Oiling as an Act of Love
In India, hair oiling is more than just self-care. It is a cherished ritual of love passed down through generations. The Sanskrit word sneha translates to both “oil” and “love,” reflecting the deep emotional connection behind this practice. From a grandmother massaging oil into
her granddaughter’s hair to parents caring for their children, this timeless act is as much about bonding as it is about beauty.
Bringaras: Ayurvedic Strength for Your Hair
At Kama Ayurveda, Bringaras is our Ayurvedic expert for complete scalp and hair health, inspired by the traditional Bringadi oiling ritual.
The Bringaras range, powered by a blend of False Daisy (Bhringaraj) to strengthen hair, Indigo to soothe the scalp, and Balloon Vine to protect and balance, works from root to tip to restore vitality.
Every formula is plant-based, clinically tested, and formulated to address the most common concerns in India today:
· Hair fall
· Dullness
· Scalp irritation and imbalance
· Dandruff
· Damage
· Oily Scalp
From deep-cleansing scalp scrubs and balancing shampoos to reparative masks, shine serums, and the signature Bringaras Scalp & Hair Oil, this ritual offers everything you need for strong, lustrous hair and a healthy scalp.
Bringaras Scalp & Hair Oil: Restore Balance and Invigorate Hair
Our hero formula, the Bringaras Scalp & Hair Oil, is a nourishing Ayurvedic blend of Bhringaraj, Indigo, and Balloon Vine. It balances the scalp, strengthens the roots, and leaves hair glossy and resilient.
Clinically proven results show:
· +50% instant boost in scalp nourishment
· +20% improvement in scalp strength
· +21% increase in hair density This makes it one of the most effective Ayurvedic hair oils in India for those struggling with hair thinning, breakage, or scalp discomfort.
How to Get the Most from Your Hair Oiling Ritual
To get the most from Ayurvedic haircare, consistency and technique are key. Follow this ritual for healthy, nourished hair:
· Warm the oil slightly between your palms before applying to release its natural properties.
· Begin at the crown and massage the scalp in gentle circular motions with your fingertips to stimulate blood circulation.
· Spread the oil evenly from scalp to ends, using light pressure for maximum absorption.
· Leave it on for at least 20 minutes or overnight for deeper nourishment (cover your pillow to protect bedding).
· Rinse by applying shampoo directly to oiled hair before adding water, then wash thoroughly. Pair with Bringaras Balancing Shampoo for best results.
Why Bringaras is the Future of Haircare in India
As more people move toward natural, chemical-free beauty solutions, Ayurveda offers a proven path to healthy, resilient hair. Bringaras is not just another oil but a complete Ayurvedic haircare ritual that restores balance, strength, and shine from scalp to strand.
By reviving this age-old Indian tradition with clinically tested, plant-powered formulas, Kama Ayurveda’s Bringaras range helps you care for your hair the way it was always meant to be, naturally, effectively, and with love.
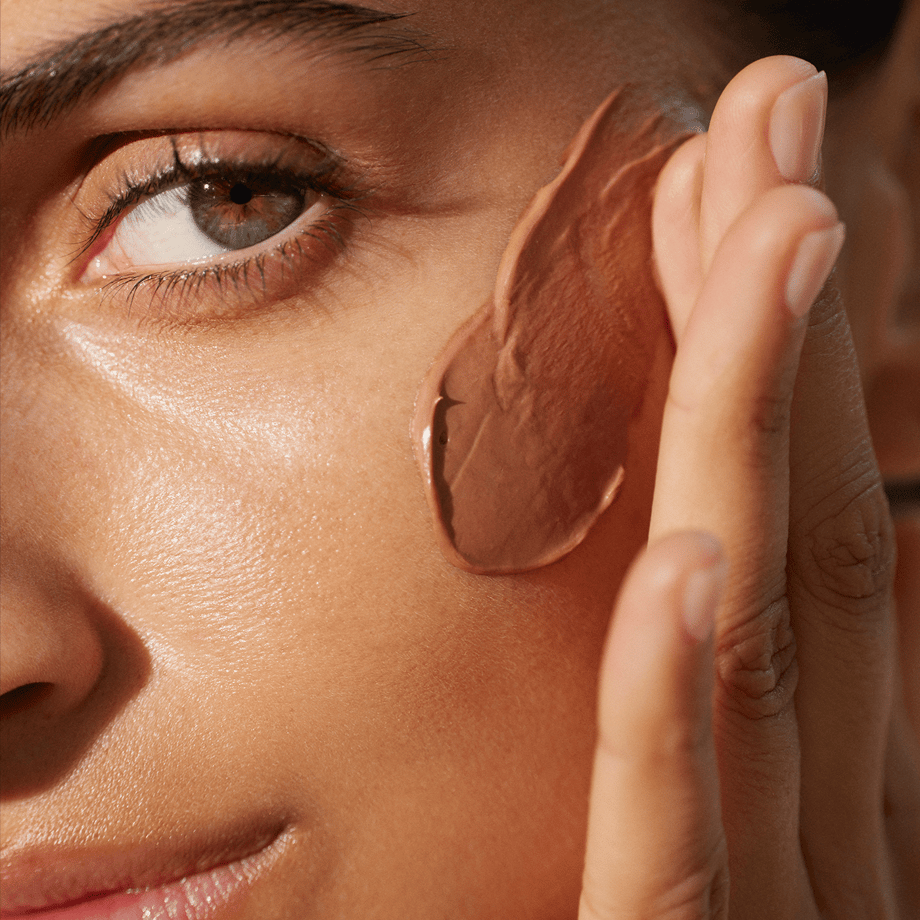
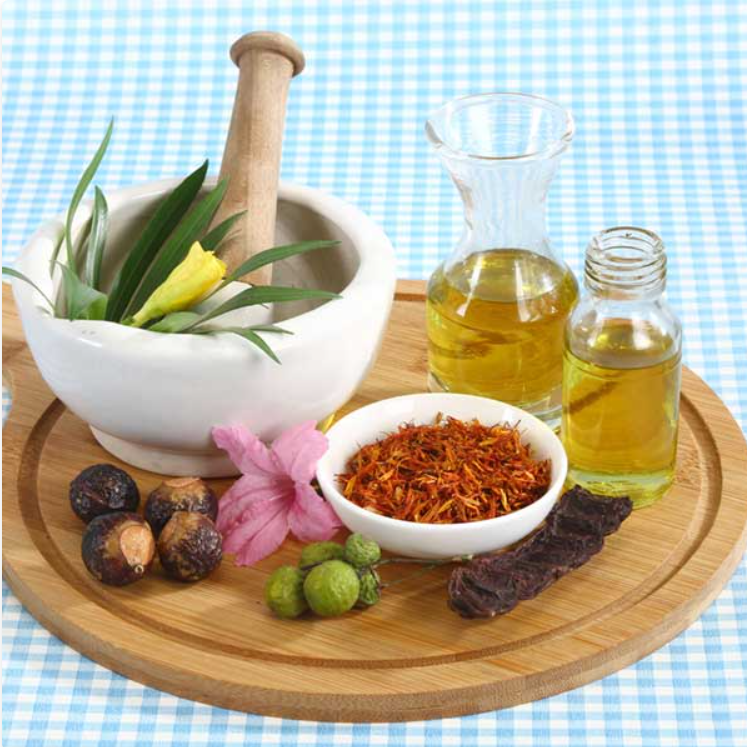
The tradition of using Ayurvedic face masks {lepam} dates back thousands of years and is deeply rooted in India's whole-body, holistic system of medicine. Originally applied for pain relief, wound healing and treating skin conditions, these glow-boosting treatments are now more commonly used in beauty and skincare to provide nourishment, enhance radiance and restore balance to the skin.
At Kama Ayurveda, the age-old Indian skincare ritual has found a modern-day guise in our new mask formulations, powered by Ayurvedic botanicals that are wisely combined according to Ayurvedic principles.
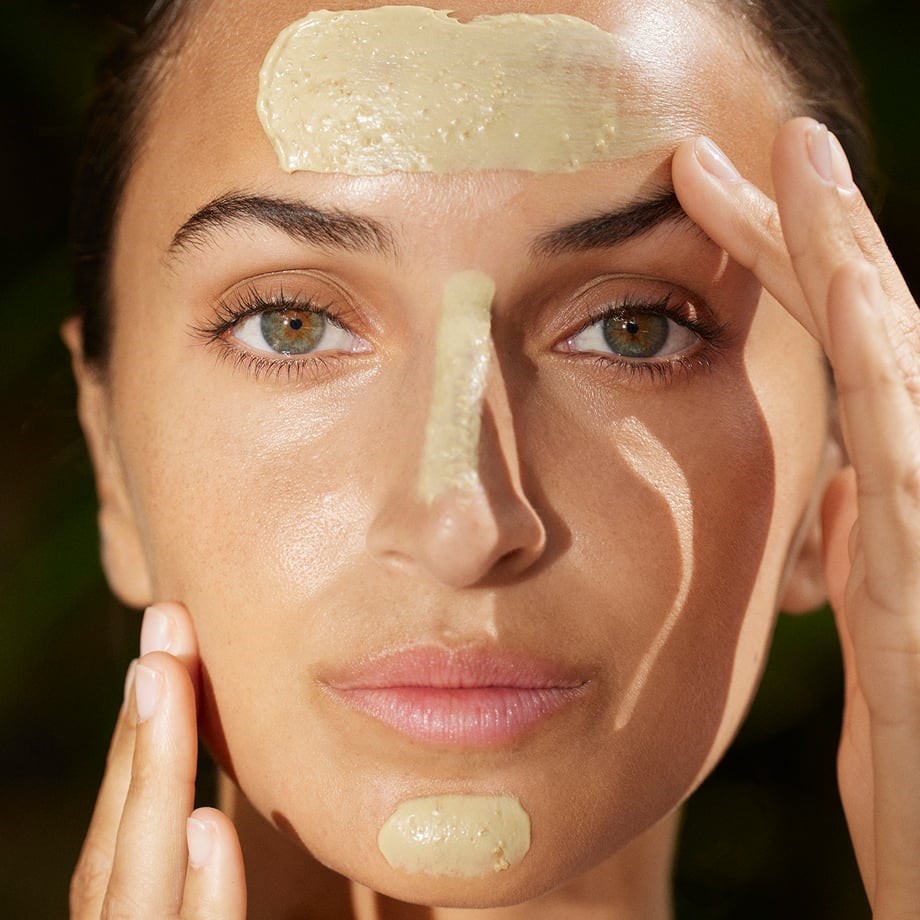
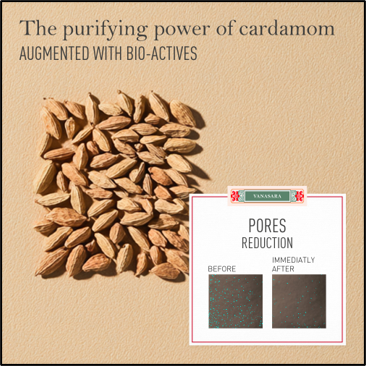
The Cardamom Purifying Mud Mask is a complexion-clearing and pore-tightening formulation perfect for blemish-prone skin. This mud-textured mask uses Cydonia clay, known for its rich mineral content and healing properties, combined with purifying Indian cardamom, anti-inflammatory cleome gynandra (spider plant), and infused with brightening orange botanical fragments.
Step 1: Apply the Cardamom Purifying Mask on T-Zone (forehead, nose & chin)
The new range of remedy masks includes the Cardamom Purifying Mud Mask, a complexion-clearing and pore-tightening formulation perfect for blemish-prone skin. This mud-textured mask uses Cydonia clay, known for its rich mineral content and healing properties, combined with purifying Indian cardamom, anti-inflammatory cleome gynandra (spider plant), and infused with brightening orange botanical fragments. Massage a thick layer on your skin, leave it for 10 minutes and rinse off for a shine-free complexion.
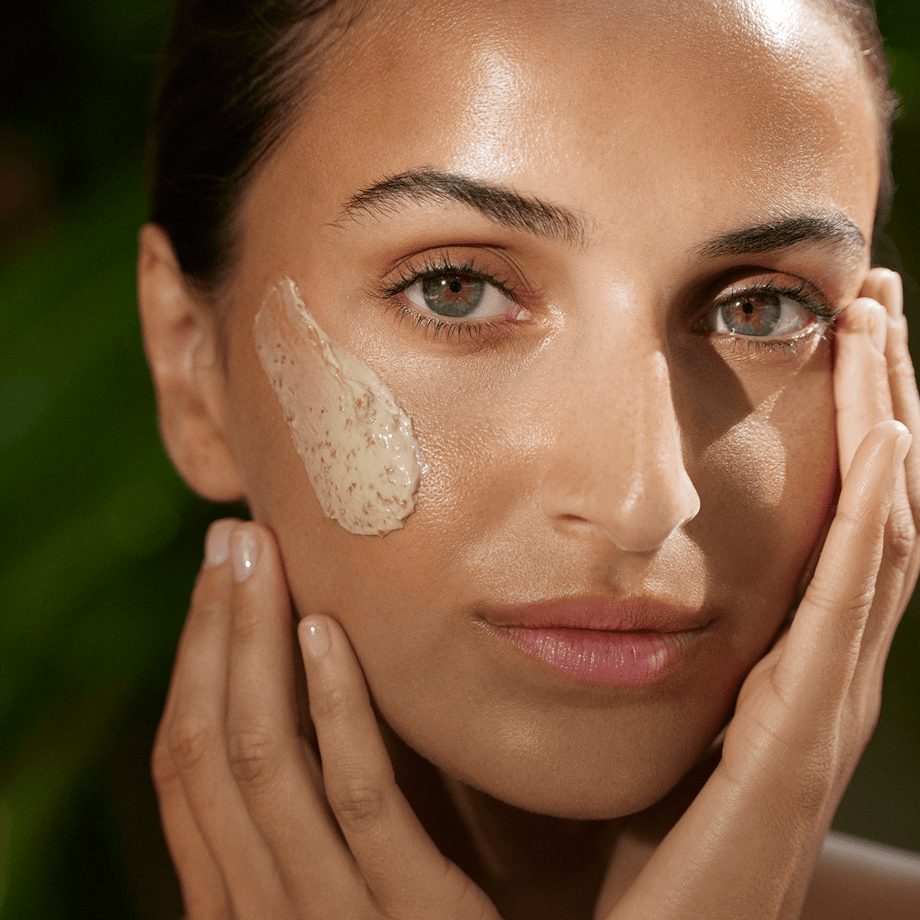
Step 2: Apply the Rose Hydrating Mask on the cheeks
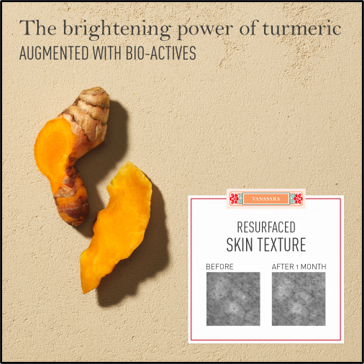
The final mask in the new range, the Turmeric Brightening Clay Mask, is a fine creamy clay-textured mask formulated with rose clay and infused with turmeric, sandalwood and ginger botanical fragments. The Turmeric Brightening Clay Mask works to deeply resurface and soften skin for a smooth and youthful glow.
Step 3: Apply the Turmeric Brightening Mask on the top cheeks & temples
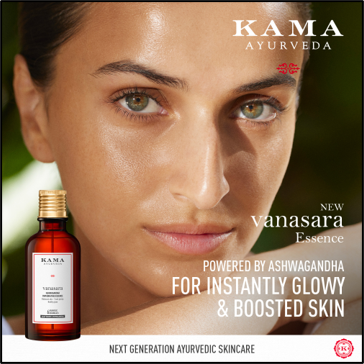
Finish the regime with an energising spritz of our new Ashwagandha Invigorating Essence for hydration followed by a serum and a face cream for best results.
In the midst of hectic schedules and city stress, finding time for self-care often falls to the bottom of our to-do lists. But what if you could bring the experience of an Ayurvedic spa right into your home?
Our new Vanasara collection includes Cardamom Purifying Face Mask, Turmeric Brightening Face Mask, Rose Hydrating Yoghurt Mask and Ashwagandha Invigorating Essence. These powerful ready-to-use face masks and essence are a perfect addition to boost any beauty ritual with instant efficacy.
Whether you're looking to deeply hydrate, brighten dull skin, or purify clogged pores, the Vanasara collection offers a mask for every concern — along with a potent daily essence to complement your ritual.
Rooted in Ayurvedic Wisdom: About Lepams and Kashayams
Our new Vanasara innovative range pays homage to the time-honoured rituals of lepams and kashayams—potent Ayurvedic formulations that have been trusted for centuries. Lepams, deeply nourishing herbal pastes, were once meticulously crafted in kitchens and temple courtyards, where they were applied to soothe inflammation, brighten dull skin, and fade blemishes with the healing power of nature. Kashayams, on the other hand, were more than just herb-based water decoctions, used both internally and externally for holistic healing. Inspired by these revered traditions, the Vanasara collection blends ancient knowledge with modern innovation.
Crafted with at least 98% natural ingredients and enriched with more than 5 potent bio-actives, these formulations harness the power of Ayurveda to deliver visible, transformative results while staying true to its purest essence.
Crafted with the power of turmeric, this Vanasara Turmeric Brightening Face Mask is your go-to for dull, tired-looking skin. Infused with turmeric, pink clay, sandalwood, and ginger, it gently exfoliates skin and helps refine pores, revealing a healthy, radiant glow.
How to Use
Use once or twice a week on cleansed skin. Apply an even layer to the face and neck. Leave on for 10–15 minutes, then rinse with lukewarm water. Follow up with the Vanasara Essence for best results.
Benefits
This mask helps improve skin tone, promotes a healthy glow, and gently removes surface impurities to reveal brighter, more even skin.
+60% Long-Lasting Hydration* with Rose Hydrating Yoghurt Mask
This deeply hydrating face mask is infused with rose petal fragments, hibiscus hydrosella™, and a creamy yoghurt-like texture that calms and plumps the skin. Ideal for restoring moisture and nourishment.
How to Use Apply generously to clean skin once or twice a week. Leave on for 10–15 minutes. Wipe off with a damp cloth or rinse off. Seal in hydration with the Vanasara Essence.
Benefits
Vanasara Rose Hydrating Face Mask boosts hydration and softs dry, dehydrated skin. Infused with plant-based actives, it enhances skin elasticity, leaving the skin soft & dewy.
-92% Instant Sebum Reduction* with Cardamom Purifying Mud Mask
Get purified, balanced skin with new Vanasara Cardamom Purifying Mud Mask, now powered by advanced botanicals like Pixalia® and Imercare® Kaolin Clay draw out impurities, balance sebum, and minimises the appearance of pores, making it a great pick for oily or combination skin.
Benefits
This clarifying face masks helps unclogs pores and reduces excess oil, leaving your skin refreshed without drying it.
How to Use
Apply once a week, especially to the T-zone or areas prone to congestion. Leave on for 10–12 minutes and rinse thoroughly. Follow with the Vanasara Essence.
Lightweight and alcohol-free, our NEW Vanasara Ashwagandha Invigorating Essence is powered by the adaptogenic strength of Ashwagandha and 4 floral waters (Neroli, Mogra, Vetiver and Rose),delivers an instant boost of hydration. Ideal to prep your skin to absorb nutrients from skincare, it also helps revitalise dull skin and strengthen skin barrier.
While you can layer it under your serums and creams, it’s also a perfect companion for your weekly masking ritual.
How to Use
Use every morning and evening after cleansing on cleansed skin. The essence van be followed by a serum, face cream or oil. You can spray it anytime during the day for an instant fresh glow.
Benefits
Perfect for addressing concerns like dullness and damaged skin barrier, this multi-purpose mist offers preps and balances skin and enhances the effectiveness of your skincare regime.
Make It a Ritual
Whether you're unwinding after a long day or prepping for a fresh start, this range encourages you to slow down, connect with your skin, and enjoy the quiet luxury of mindful care — right at home.
You can shop any of these masks basis your skin type or even useall 3 face masks in areas of targetted concerns such as dryness, oiliness and brightening.
Understanding the root cause of skin dryness can often be challenging. External factors like changes in weather, arid climates while lifestyle habits such as hot showers, and using harsh products can all contribute to dry skin. One thing is certain—no one enjoys the itchy, tight, and uncomfortable sensation that accompanies dry skin.
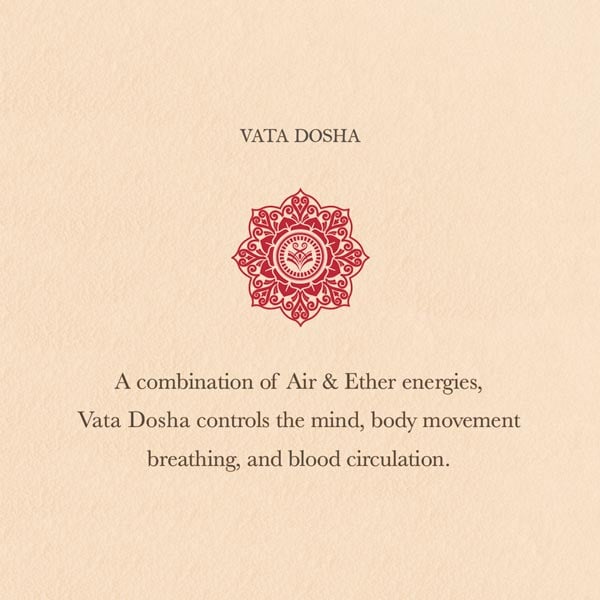
When left untreated, dry skin (referred to as the Vata skin type in Ayurveda) can escalate into more severe issues, such as cracking or even infections.
The good news is that dry skin isn’t always a serious concern and can often be remedied naturally. Incorporating home remedies into your routine is an effective way to restore hydration and comfort to your skin.
Why Choose Home Remedies For Dry Skin?
Dry skin is particularly prone to irritation. While numerous over-the-counter products claim to address this issue, they often fall short. Many contain chemicals that may leave your skin feeling even drier, while others include preservatives or artificial fragrances that can aggravate sensitive skin.
Home remedies and natural solutions, on the other hand, are free from such irritants. They provide a pure, chemical-free way to nourish and soothe your skin. When it comes to skincare, simplicity is key—and nature often provides the best answers.
What Causes Dry Skin and How Home Remedies Help?
Before we talk about treating dry skin, it’s important to understand what causes dry skin conditions. Did you know that your skin has the natural ability to produce oil, also known as sebum? This natural oil of your skin forms a protective barrier that protects the skin from damage and locks in the moisture content. However, certain factors like dry climate, aging, and even excessive washing of face can strip your skin of this natural protective layer. As a result, your skin loses its ability to lock in water and moisture. This leads to dry skin.
Home remedies such as treating your skin with natural oils are helpful as they restore the skin’s protective moisture barrier.
12 Top Home Remedies For Dry Skin
Having established that home remedies are one of the most effective (not to mention, also one of the most affordable) ways to take care of dry skin concerns, let’s look at some of the top remedies for dry skin.
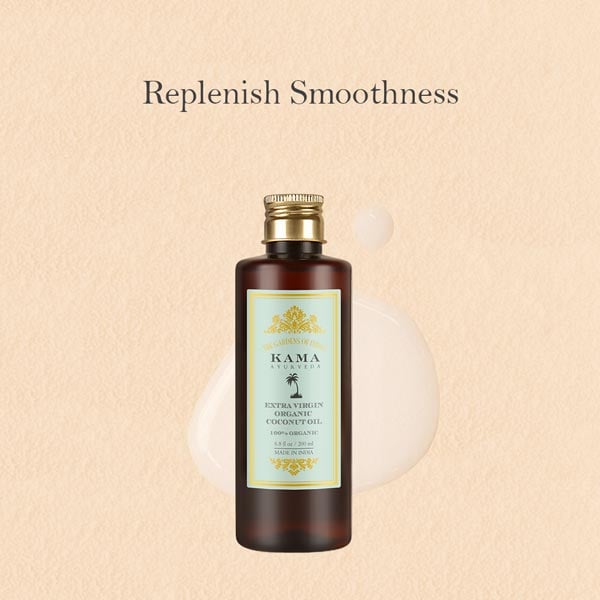
1. Nourish Your Skin With Coconut Oil
Did you know that one of the most important Ayurvedic treatments for dry skin is Abhyanga? Abhyanga is simply a practice of self-massage with natural oils. For this, Coconut Oil, Almond Oil, Sesame oil, and Castor oil are considered excellent massage oils.
Among them, the most effective oil for dry skin is Organic Coconut Oil. Research has found that Coconut Oil has emollient properties. An emollient is a substance that is able to create a smooth surface by filling in the gaps in the skin cells. Coconut oil is rich in fatty acids (lauric acid) which help hydrate the skin and improve its lipid content.
The best thing about using coconut oil for dry skin is that you need not be worried about any side effects. As long as you are using 100% pure Coconut Oil, you can use it daily and even on sensitive skin.
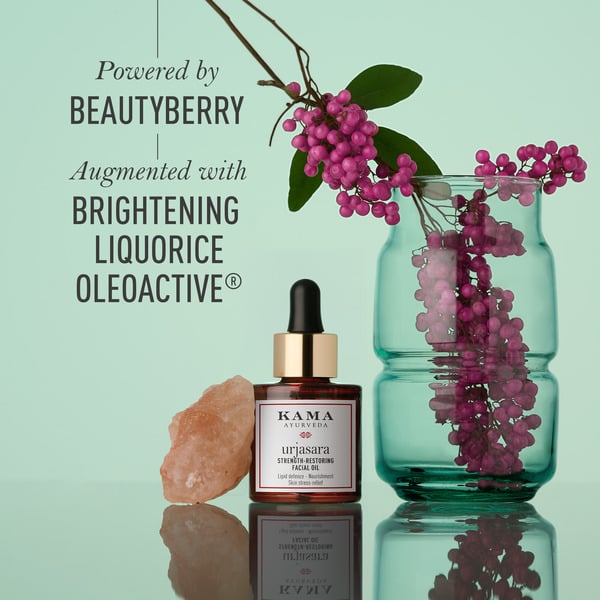
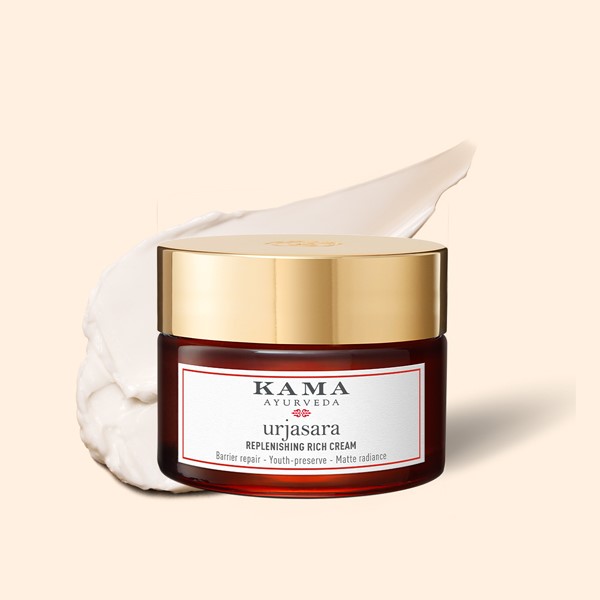
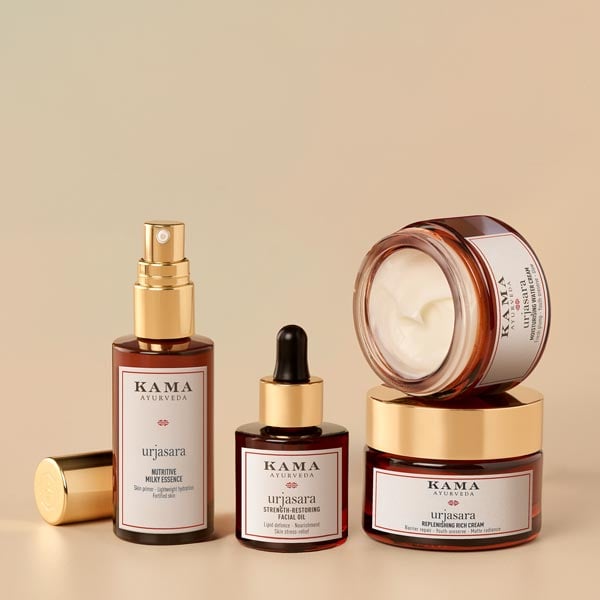
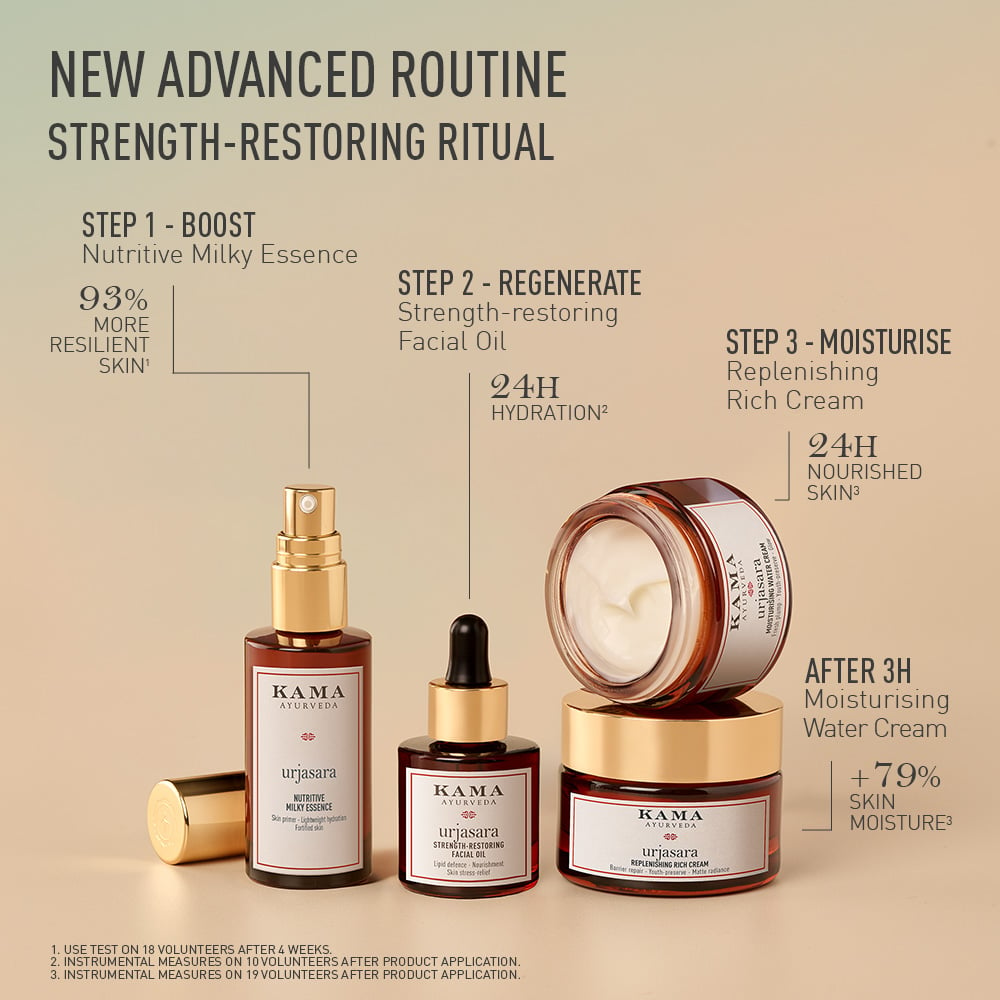
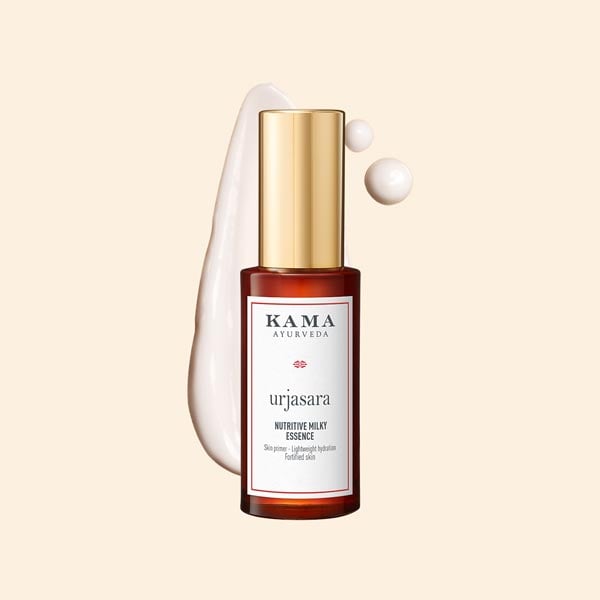
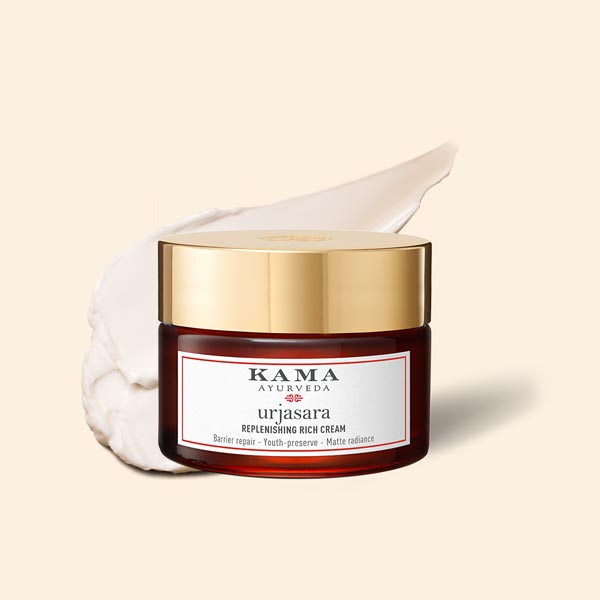
When it comes to mukhabhyanga or face massage, try Kama Ayurveda’s Urjasara Facial Oil. Enriched with 35 Ayurvedic botanicals, including brightening Liquorice Oleoactive®, it’s enriched with the best of plant-based actives to replenish and protect skin. Its rich texture absorbs effortlessly, delivering moisture and balance while soothing stressed skin, leaving it nourished and resilient.
2. Mukhabhyanga with Urjasara Facial Oil
Urjasara Facial Oil goes beyond hydration by repairing the skin’s barrier, ensuring long-lasting moisture retention. With regular use, this facial oil enhances your complexion’s overall health and resilience, making it an essential part of your daily skincare ritual for a smoother, more glowing appearance.
Free from controversial ingredients and artificial fragrance, Urjasara Facial Oil is dermatologically tested for all skin types, including sensitive skin.
3. Give Your Skin An Oatmeal Bath
Lately, a lot of people have started including oatmeal in their diet as a healthy breakfast option. But did you know that oatmeal can be applied to your skin to get immense benefits?
Oatmeal is prepared simply by adding water to ground oats. The prepared mixture has special colloidal properties due to which it binds to the skin and works as a protective barrier to lock in the moisture content. Therefore, giving your skin an oatmeal bath is an effective remedy for dry skin conditions such as psoriasis and eczema.
The benefits of oatmeal for dry skin are immense.
Its anti-inflammatory and antioxidant properties also help in healing skin dryness and prevent infections. Oats are one of the most gentle and soothing natural ingredients that you can treat your skin with. It’s naturally hydrating for the skin. However, it’s important that you follow your oatmeal bath with moisturisation to lock in the hydration.
One way to give your skin all the benefits of oatmeal is to use Ubtan, which is an Ayurvedic soap-free skin cleanser. It’s 100% natural and contains Oatmeal as one of the key ingredients along with other natural ingredients such as Green Gram, Almonds, Neem, Turmeric and Fennel. Due to its all-natural composition, it’s gentle on the skin and doesn’t cause any dryness.
4. Make moisturisation a part of your daily routine
You might be well aware that Cleanse, Tone and Moisturize is the recommended 3-step skin care regimen for all. However, lack of time often makes us ignore these basics of skin care. As a result, our skin suffers.
One of the ways to prevent and cure skin dryness is to swear by your daily moisturisation regimen. In fact, just moisturising your skin once a day isn’t enough. You get best results when you moisturize twice - once in the morning and once during the night.
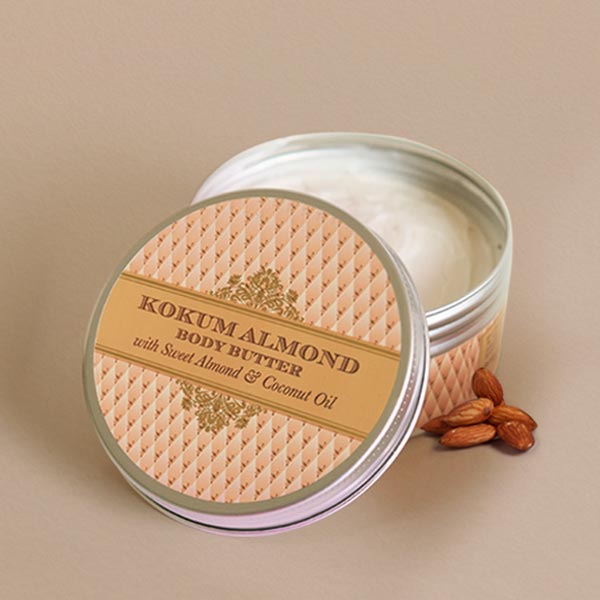
Of course, the moisturisers that you choose for your skin matter just as much. We recommend that you use natural moisturisers as they are better suited for dry skin. During winters, when your skin is dry, you will benefit from using rich body butters to nourish your skin. Here are our top recommendations for natural daily moisturisation.
5. Treat your skin with home-made natural face masks
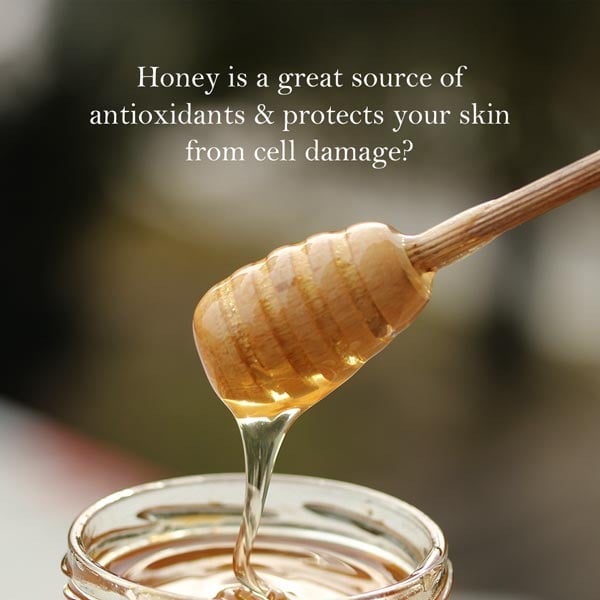
When you choose the right ingredients, your face mask can provide your skin with a rich dose of moisturisation and nourishment. For dry skin, effective natural face masks can be prepared by using hydrating constituents such as Avocadoes, Honey and Oatmeal and Milk. Here are a few home-made masks for you to try.
Avocado Face Mask - Puree half an avocado and mix it with one teaspoon of olive oil to prepare a paste. If your skin is very dry, you can also add a tablespoon of honey to make your skin even more nourishing. Apply the mask to your face and leave it on for about 15 to 20 minutes, and then wash it off.
Oatmeal Honey Mask - Honey has moisturizing, healing and anti-inflammatory properties and it also effective remedy for dry skin. Mix two tablespoon of oats with one table spoon of honey. Leave this mask on for 15 to 20 minutes to let it work as a soothing, hydrating mask.
Milk Mask - Milk is an excellent remedy for dry and flaky skin. It replenishes the lost oils in the skin and make it smoother and more moisturised. The healthy fats in the skin leave the skin naturally moisturised. Dip a cotton ball in milk and dab all over the face. Allow it to stand for 20 minutes and wash with cold water. Alternatively, you can mix honey and milk and apply the mixture as face mask on your skin for even better nourishment.
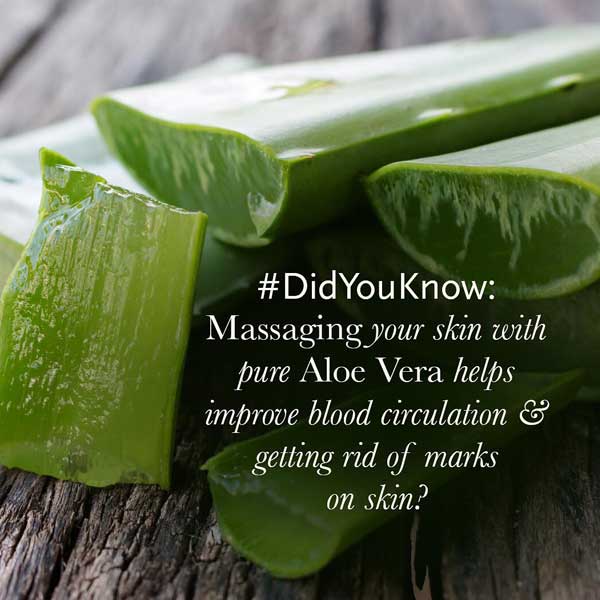
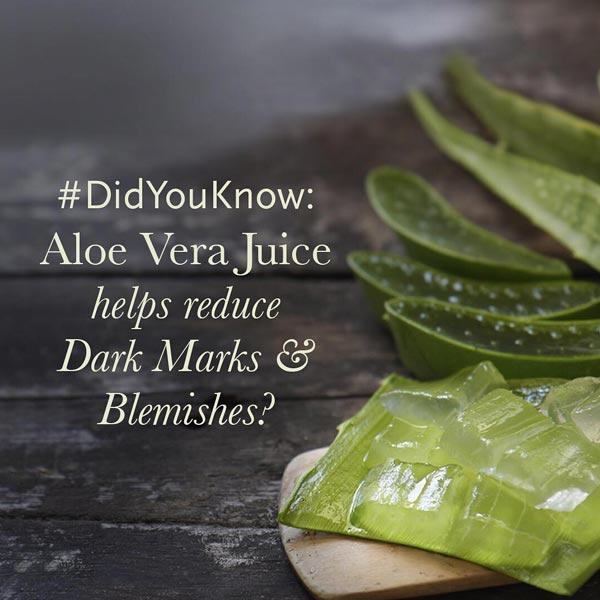
5. Massage Your Skin With Aloe Vera
Did you know that Alove Vera gel has skin healing properties? The answer to your dry skin woes is this wonderful plant that might be growing in your garden.
Popular as a remedy for sun burn, Aloe Vera gel is also effective in treating skin dryness. The gel contains mucopolysaccharides, which help lock moisture into the skin. It’s used to get relief from redness and skin irritation associated with skin dryness. The best part is that you can easily apply it on your skin. All you need to do is scoop out the Aloe Vera gel from the leaf and massage it into your skin.
6. Include Anti-Oxidants and Omega -3 In Your Diet
What you eat reflects on your skin and hair. One of the best ways to take care of skin dryness is to eat food items that are rich in anti-oxidants and Omega-3 fatty acids.
The top recommendations for including anti-oxidants in your diet are blueberries, tomatoes, carrots, beans, peas, and lentils. For healthy fats, you can include avocados, walnuts and sunflower seeds in your diet.
7. Adjust Your Bath Temperature
Your showering habits play a huge role in determining your skin health. Afterall, that’s one thing most of us do every single day. Are you someone who enjoys hot water showers? Then, you’ll be disappointed to know that they are the reason behind your dry skin woes.
It’s strongly recommended to avoid hot showers and limit bath time to 10 minutes. Also, check what soap you are using for taking a shower. Some soaps dry out the skin excessively. Switch to natural soaps or natural body cleansers to maintain your skin’s moisture content. You can even add a suitable essential oil to your bath to treat dry skin.
Now, here’s the tip that’s the easiest to follow but also the hardest simply because we forget. Your water intake can make or break your skin, literally. Boost your water intake to keep your body hydrated and to moisturize your skin from the inside out.
9. Wear Sunscreen Regularly
If you think the arid winters are the only culprit behind dry skin conditions, you are wrong. Harsh sunlight during the summers damage your skin’s protective barrier and also lead to skin dryness. The solution? Never step out in the sun (be it during winters or summers), without adequate sun protection.
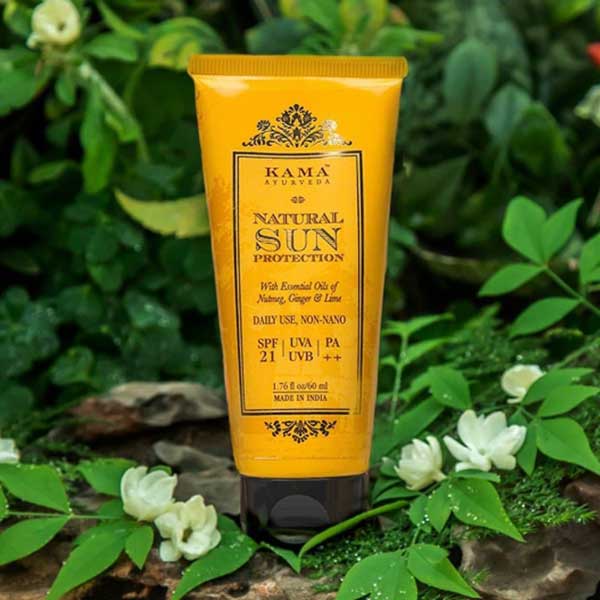
We recommend Natural Sun Protection for dry skin. It is a non-chemical daily-use sunscreen that provides full-spectrum sun protection and a boost of hydration to keep skin healthy and even-toned.
If you’ve an air conditioning system, it could lead to skin dryness. Most heating systems suck the moisture from the air. However, you can use a humidifier and set it at about 60 percent to offset this effect. Along with this, wearing gloves during wintertime will particularly help you combat skin dryness in your hands.
With that, we conclude our list of top home remedies for dry skin. While these remedies will help you nourish dry skin, it’s important that you follow healthy skin care practices in the long term. In case you do not get relief from home remedies, we recommend that you consult a dermatologist.
Aging gracefully is something we all aspire to have. While there’s no way to arrest ageing, you can reduce the appearance signs of ageing, maintain a good lifestyle and always keep others guessing about your age. While most of us Indians see fine lines and wrinkles, only in our forties, other signs of ageing such as sun damage, pigmentation and dark spots start as early as our twenties. Ayurveda has ancient, time-tested recipes and formulations that can help prevent signs of ageing in the form of creams. Here are some of the best anti-aging creams to add to your daily skincare ritual for healthy, youthful skin.
Before we talk about the best anti-aging creams in India, let us learn everything we need to know about anti-aging creams.
What Is An Anti-Aging Cream, And What Are Its Benefits?
Simply put, an anti-aging cream is commonly referred to cream rich in anti-ageing ingredients ranging for antioxidants that help maintain youthful, bright and firm skin. These creams are specially designed to prevent early signs of aging like blemishes, wrinkles, fine lines, and dark spots. With advanced science and carefully selected ingredients, they promote a smoother, tighter complexion, leaving your skin looking refreshed and rejuvenated.
Benefits Of Using An Anti-Aging Cream Regularly
Invented in the early 2000s, anti-aging creams take time to bring visible results. Slow results might be the reason why some people speculate about its effectiveness. However, once you know its excellent benefits, you will want to buy one for yourself.
Tightens Skin
The skin loosening or skin laxity after age 35 is due to the reduction of collagen levels, elastic fibers, and hyaluronic acid. Anti-aging creams help increase collagen production to keep skin firm and tight.
Slows Down The Signs Of Aging
Besides skin laxity, our skin is also prone to fine lines, wrinkles, discoloration, and blemishes. All such signs of aging can be treated using an anti-aging cream.
Brightens The Skin
Your skin may begin to lose its natural glow as you age. Fortunately, you can reduce skin dullness with an anti-aging cream. A good quality anti-aging cream helps brighten the skin while reducing pigmentation and dark spots.
Boosts Confidence
When your skin is completely rejuvenated, you will be filled with a new level of confidence. Nightly skin care ritual with an anti-ageing cream is also a great way to make time for self care.
Saves Money In Long Run
Compared to those several skin surgeries to reduce the signs of aging, using an anti-aging cream is very cost-effective and sustainable. Not just saving money, an anti-aging cream also has fewer side effects when compared to laser surgeries.
Things To Consider Before Buying An Anti-Aging Cream
Dealing with aging and its signs can be difficult, but you can tackle them with an anti-aging cream. However, this can only be possible when using a qualitative and harmless product.
Since millions of fictitious and futile anti-aging creams are available on the market, it can be very confusing to pick the best one. But don't worry, with the following buying guide, you can select the best one within minutes.
Choose The Anti-Aging Cream That Suits Your Skin Type
Choosing the product that best suits your skin type ensures you are not harming your skin any further. For example, if you are having dry skin, go for a moisturizing anti-aging product and if you are having oily skin, opt for a mattifying product.
If you have sensitive skin, anti-aging cream can cause redness or irritation. In addition, with acne-prone skin types, the problem could get aggravated. Therefore, to be safe, ensure the cream you use is suitable for all skin types and is free from harmful chemicals.
Consider What Goes Into The Cream
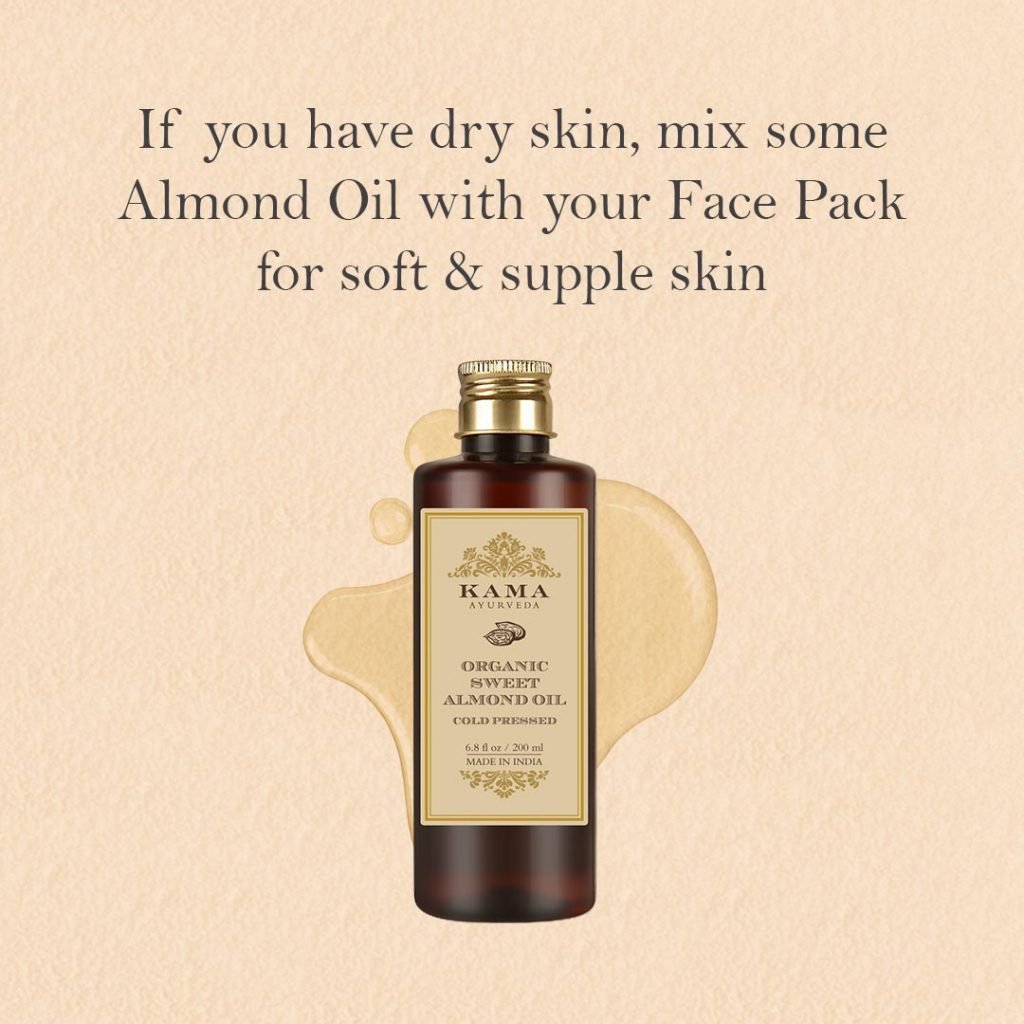
Look for ingredients like Saffron, Arjuna Extracts, Centella Asiatica, Aloe Vera, Indian Madder, Turmeric, Green tea extracts, Almond oil, and Olive oil. Ingredients like these reduce oxidation, help tighten the skin, make it firm, and reduce fine lines, wrinkles, and blemishes without causing side effects in the long run. The cream should also include nourishing ingredients to retain the moisture in the skin and diminish the appearance of fine lines.
Check The Consistency Of The Cream
An anti-aging cream shouldn't be heavy on the skin. Instead, it should have a lightweight consistency to blend into the skin quickly and easily. Moreover, if the cream has a light consistency, it supports massaging your skin without feeling any greasiness or oiliness.
SPF Protection Is A Plus
One of the primary causes of fine lines and wrinkles is the harmful UV rays from the skin. If your anti-aging cream is infused with SPF, it helps protect your skin from sun damage and keeps it wrinkle-free. If your cream doesn't have SPF, make sure you use sunscreen regularly and frequently.
Read Online Reviews
The right way to check the authenticity of any skincare product is by checking its online reviews. Read all the reviews (both bad and good) to make you understand the in and out of the product. If your product has good reviews, then go for it. As if it works for others, there are high chances that the product might work for your skin as well.
Which Is The Best Anti-Aging Cream In India?
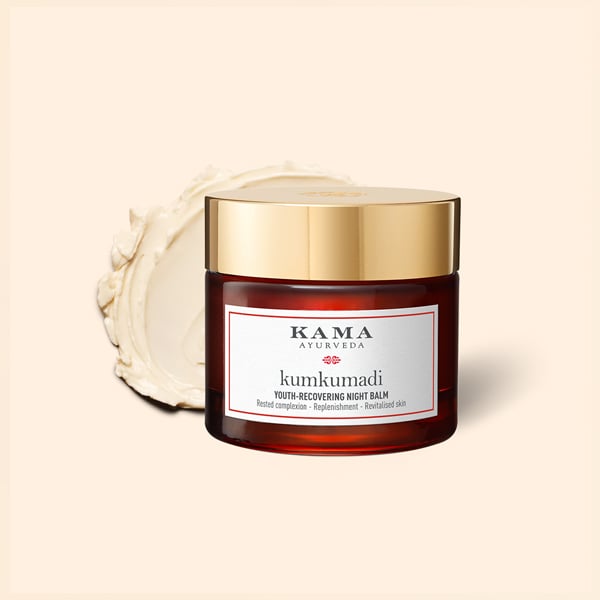
Kama Ayurveda's Kumkumadi Youth Recovering Night Balm
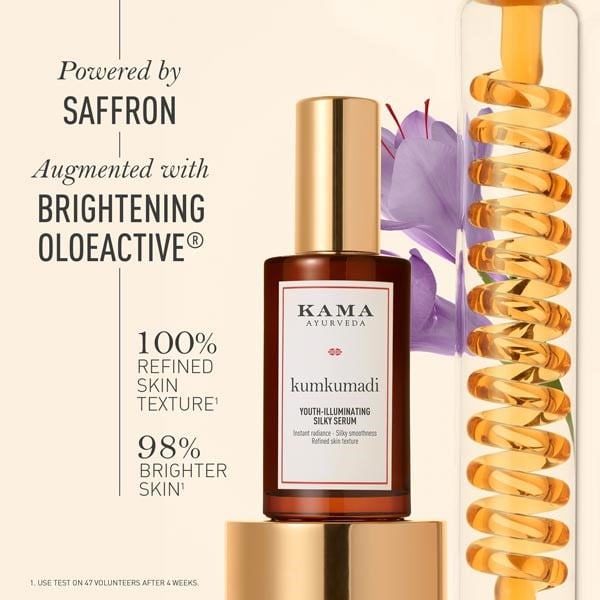
Kama Ayurveda's Kumkumadi Youth Recovering Night Balm is powered with brightening ingredients like Saffron and ceramides III that strengthen skin's natural barrier. Infused with Kumkumadi Oil, brightening Licorice Oleoactive®, and nourishing Shea Butter, it provides intense hydration and replenishment. The cream also features Recovering Ceramides III and plant-based Squalane, supporting skin recovery and leaving you with a revitalised complexion by morning. Clinically proven to enhance skin texture, it targets signs of ageing, dullness, and uneven skin tone, ensuring a rested, youthful look. This rich, enveloping formula is free from controversial ingredients and artificial fragrances, making it safe for all skin types, including sensitive skin.
Benefits
Kumkumadi Night Balm is enriched with 97% natural origin ingredients. It is clinically proven to make the skin more even toned by 98% and firm skin by 96% in 4 weeks.
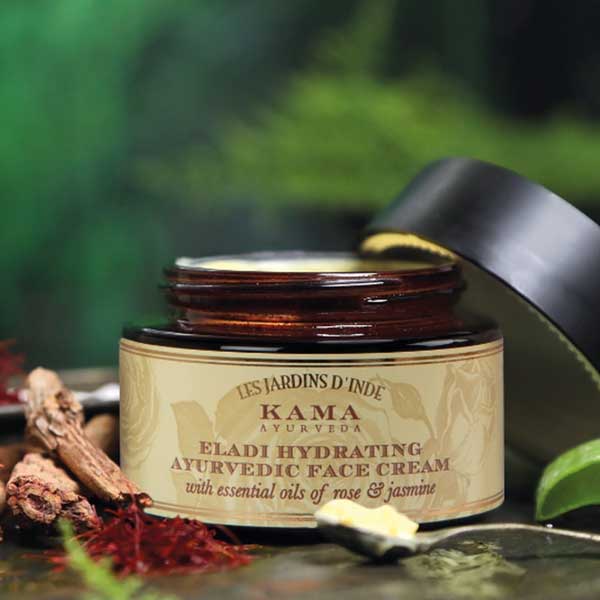
Kama Ayurveda's Eladi Hydrating Ayurvedic Face Cream
Kama Ayurveda's Eladi Hydrating Ayurvedic Face Cream is a nourishing, rich formula for intense moisturization to give your skin added barrier protection. In the ancient text of Ashtanga Hrudayam, this Ayurvedic cream is prescribed as an ideal treatment for herbs processed in Sesame oil and Coconut milk.
Known for their Varneekarana properties, Cardamom and Costus can enhance skin texture. The antiseptic properties of Aloe Vera prevent acne, blemishes, fine lines, and wrinkles while giving your skin adequate sun protection. Olive oil enables the hydrating cream to easily blend into the skin without making it feel sticky and heavy. The essential oils of Rose and Jasmine in the cream nurture and purify naturally healthy-looking skin.
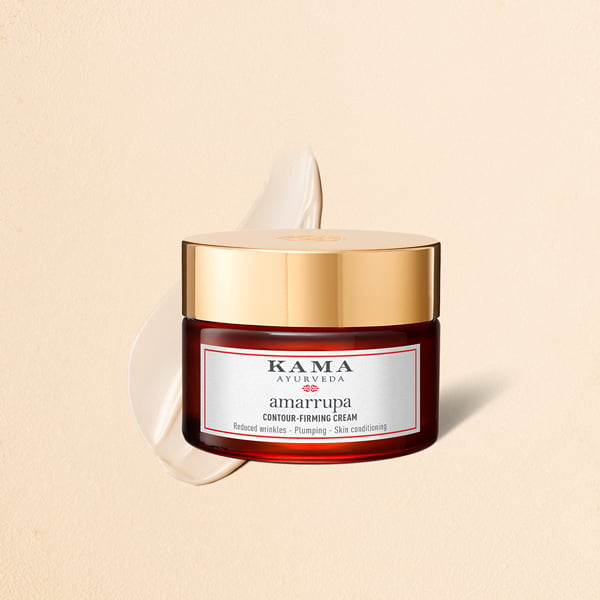
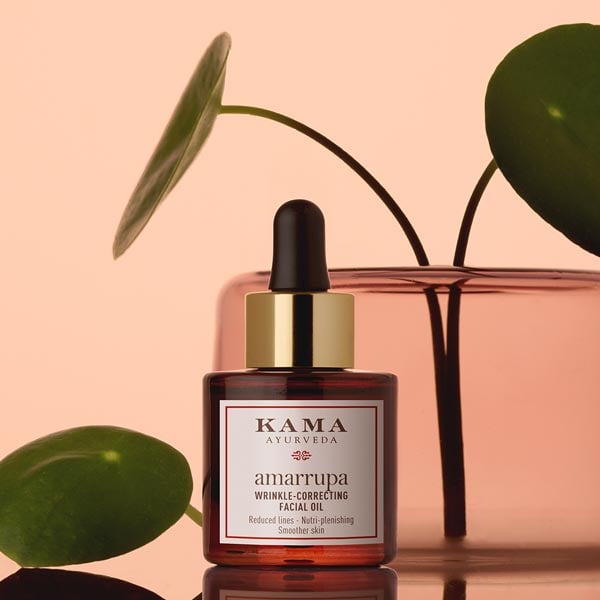
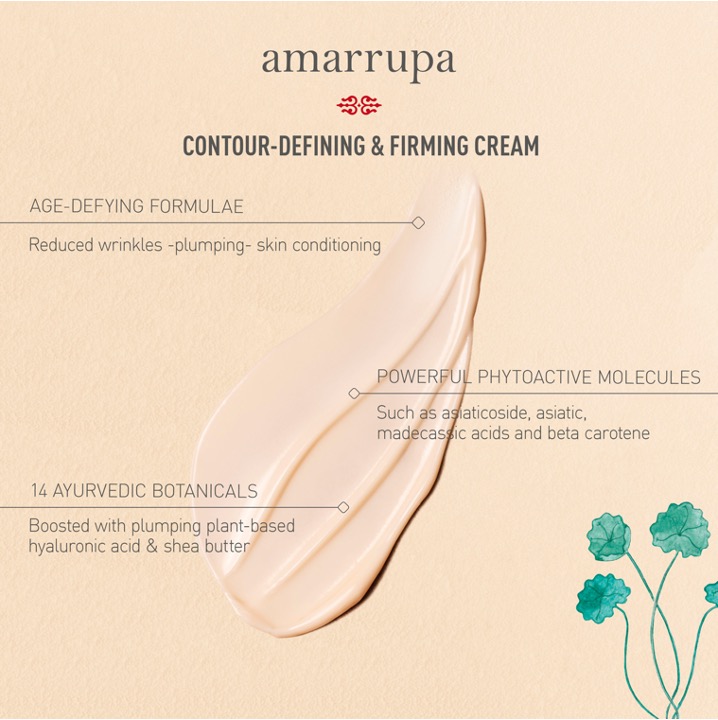
Amarrupa Contour Defining & Firming Face Cream
Kama Ayurveda's Amarrupa Contour Defining and Firming Face Cream is designed to visibly reduce wrinkles, restore elasticity, and replenish skin for a firmer, plumper, and softer look. This light, plumping cream is enriched with potent ingredients like Amarrupa Oil, known for its smoothing and firming properties and Terminalia Arjuna Oleoactive® energises and revitalises fatigued skin, while Smoothing Shea Butter delivers lasting nourishment and softness.
Benefits
Clinically proven to enhance skin replenishment by 31%, Amarrupa Firming Face cream leaves your skin feeling revitalized and youthful. Formulated without artificial any fragrances, it's dermatologically tested and safe for all skin types, including sensitive skin.
Benefits
The Ayurvedic cream is 97.5% natural and helps nourish skin and repair its barrier.
The Costus, Cardamom, and Aloe Vera help hydrate and soften skin naturally.
The cream helps maintain skin elasticity and reduce signs of aging while keeping it soft and revitalized.
The anti-aging skincare is all about the right product and technique. Since we already know the best products to serve the job, let's talk about how to apply them correctly. Even the highest quality anti-aging cream might not serve the purpose if you don't use it correctly. Scroll down to a small guide on how to get the maximum benefits out of the anti-aging cream.
1. Mind Over The Amount
Since the anti-aging creams have a very potent formula, fewer amounts are always more with these products. If you apply more than enough, the results will not be different, but your skin will get dry and irritated. So, observe your skin needs and use the product accordingly. Massage till the cream is completely absorbed into the skin.
2. Incorporate A Sunscreen
In some cases, the potent formulations of the anti-aging creams might cause slight sensitivity in the skin. The anti-aging creams are bound to increase cell regeneration and exfoliation. Therefore, the fresh skin gets damaged quickly in the sun. Thus, the regular application of a broad-spectrum protection sunscreen is a must.
3. Be Patient
Anti-aging creams generally take 3 to 5 months to show a visible difference in wrinkles and blemishes. So, do not change the product after 6 to 8 weeks if you don't see the results. Being patient and maintaining regular usage is the key to youthful and radiant skin.
Few Tips To Slow Down The Aging Process
Along with using anti-aging skincare, you can slow down the signs of aging with the help of the following tips.
Following a proper skincare routine and never skipping the sunscreen will protect your skin from external damage and prevent wrinkles and fine lines from occurring.
Facial massages help tighten skin. You will find multiple tutorials online; try them.
Not only are alcohol and smoking habits harmful to your health, but they also make you look older. So, cut them down.
Always ensure you are maintaining a healthy and balanced diet. Include more Vitamin C foods to reduce the signs of aging.
To give your skin a natural glow, keep yourself hydrated.
Try to skip desserts once in a while, as excess sugar intake can lead to loss of collagen and elasticity.
Avoid too much screen time and try to get a good night's sleep.
Did you know silk pillowcases prevent the appearance of wrinkles? Try using them.
Release your stress by doing yoga, meditation or other favorite activities.
FAQs
1. When Should I Start Using An Anti-Aging Cream?
The ideal age for using an anti-aging cream is 21. However, more women are developing premature signs of aging nowadays due to multiple factors, including extreme pollution, excessive stress, poor food habits, bad lifestyle, hormonal imbalance, and so on. If these factors leave your skin feeling dry and dehydrated, you must start investing in an anti-aging cream even earlier.
2. How Long Does An Anti-Aging Cream Take To Show The Results?
The results entirely depend on several factors like the type of skin, the ingredients used in the product, the extent of damage that needs to be corrected, and so forth. Nonetheless, this is not an overnight incident. You need to be patient and keep using the cream regularly. However, many people start seeing visible results anywhere between four weeks to three months.
3. Is Retinol Effective For Anti-Aging?
Experts consider retinol as one of those few "magic" ingredients that can slow down the signs of aging. As a result, markets are flooded with retinol-induced products of varying strengths. However, one must be careful while using retinol for aging skin, as overuse can do more harm than good.
4. Which Anti-Aging Ingredients Are Best For Skin?
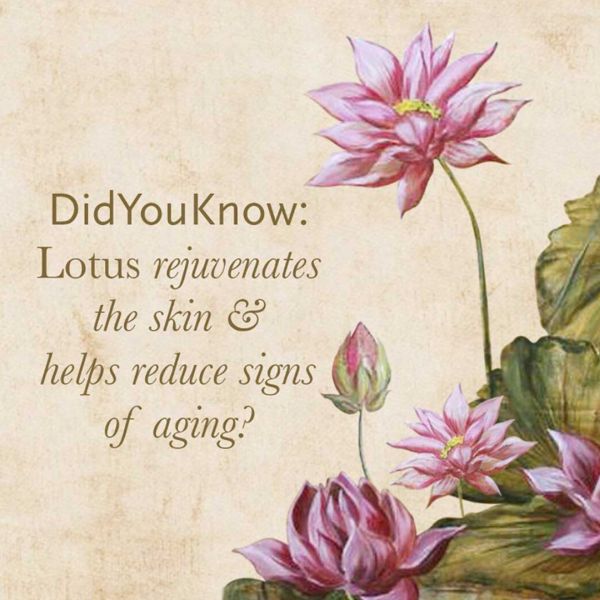
Ingredients like Retinol, Green Tea, Jojoba oil, Biotin, Caffeine, Hyaluronic acid, Kojic acid, Vitamins C, E, K, Plant Stem Cells and Lotus are some of the best anti-ageing ingredients.
5. How Often Can One Use An Anti-Aging Cream?
Generally, it is recommended to include an anti-aging cream into the daily morning routine and as well as the nighttime skincare routine for optimum results.
6. Does Anti-Aging Skincare Work?
It is scientifically proven and dermatologically tested that in the long run, regular usage of anti-aging products helps maintain youthful and radiant skin. However, no cream can completely stop this process since aging is phenomenal.
7. Does Stress Play A Role In Aging Of The Skin?
Yes, stress does play a role in skin aging. It makes your body release certain hormones that boost the speed of skin aging while decreasing the amount of collagen in the skin. This ultimately will result in the formation of wrinkles and fine lines.
If you often go to bed without taking off your makeup or giving your skin proper nourishment? If yes, then you might notice your skin looks tired and dry when you wake up. A good night skincare routine can change that, giving you fresh and glowing clear skin every day.
During the day, your skincare products work towards keeping your skin hydrated and protected from the sun and pollution. But at night, it's a different story. Nighttime products help fix and heal your skin while you sleep. This is also when anti-aging products do their best work.
Having a skincare routine before bed has lots of benefits. It not only makes your skin stronger for the next day, but it also helps your skin repair itself faster.
Let's dive into why it's so important to take care of your skin at night, and then go through our expert recommended 5-step skincare routine to nourish skin overnight.
Why Is the Night Skincare Routine Important?
A nighttime skincare routine is vital for several reasons. Throughout the day, your skin faces a barrage of challenges – exposure to dirt, oil, pollution, sun, and wind. These elements can accumulate on your skin, leading to clogged pores.
If you wear makeup, it adds another layer of buildup that can further block pores.
At night, your skin shifts into a different mode. It's a time for your skin to breathe, recuperate, and repair the damage it endured during the day. This is also when your skin is most active in generating new cells, which improves its texture and overall health. (1)
However, if your pores are clogged, your skin can't effectively undergo its natural repair and renewal process. This is where a nightly skincare routine comes into play.
A good nighttime regimen should include deep cleansing to remove the day's buildup, hydrating to maintain skin moisture, treating any specific skin conditions you may have, and aiding the skin's natural cell renewal process and a good face cream & face oil for rejuvenation & repair as you sleep.
The Ideal 5-step Night Skin Care Routine
A simple yet effective nighttime skincare routine consists of 5 steps. Once you start practicing and noticing the results, you would want to follow it regularly. We recommend that you follow it for at least a month for visible changes.
Step 1: Makeup Removal
The biggest struggle of wearing makeup might be getting rid of it at the end of an exhausting day. But sleeping with your makeup on is considered a big cardinal skincare sin.
Usually, a cleanser alone is not enough to remove the entire makeup. There will be days when your heavy matte lipstick or signature winged eyeliner won't come off even after rinsing five times and scrubbing vigorously. Therefore, you need a makeup-remover that not only removes all your makeup effortlessly but also will leave your skin smooth and hydrated.
Having said that, you will be surprised to know what a makeup remover can do. It can literally save you from various skin concerns, including breakouts, irritation, and premature aging.
To save your skin from the havoc your makeup can wreak overnight, it is ideal to have a solid makeup remover that will ensure removing all the impurities from your skin.
Step 2: Cleanse
After removing makeup, the next step in your nighttime skincare routine is cleansing. Cleansing is necessary to remove all the dirt, excess oil, and makeup residue sitting on your skin.
Numerous cleaners are available specially designed for different concerns and skin types. Choose the one suitable for your skin type and address your problems effectively.
Tip: Never use extreme temperatures of water to wash your face. This dries out your skin and makes it look dull and lifeless.
Our Recommendation : Kama Ayurveda's Rose Jasmine Face Cleanser
A gentle foaming herbal face cleanser with a rich blend of Ayurvedic ingredients to effectively cleanse and lift away makeup and impurities. Infused with uplifting essential oils.
Toning is a very crucial step in both day and night skincare routines. Toner helps rehydrate your skin after all the oils have been washed off the skin during cleansing. It also helps shrink pores and remove any dirt that may sometimes be left behind.
Toners are easy to use, and the ones that don't contain alcohol are best suitable for any skin type. Allow your skin to absorb it thoroughly before going on to the next step for better results.
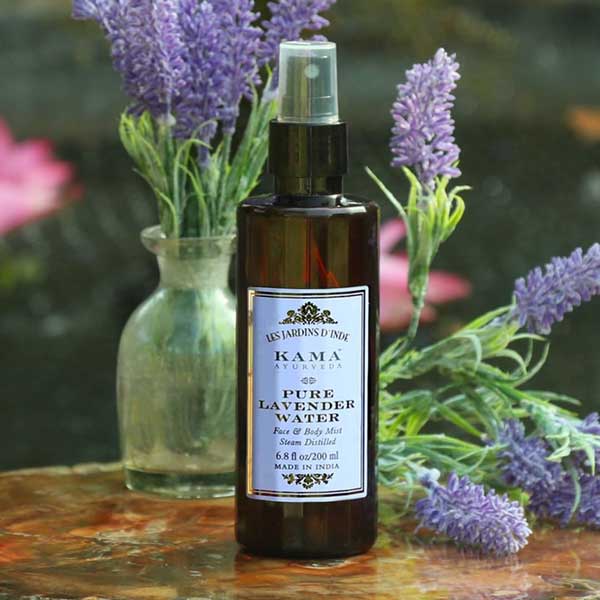
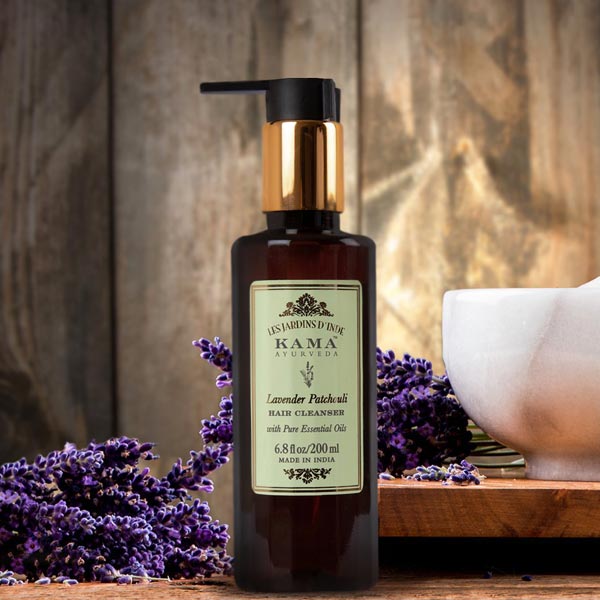
For Oily Skin (Kama Ayurveda's Pure Lavender Water)
Kama Ayurveda's Pure Lavender water is a gentle floral distillation that hydrates, cools, tones, and calms skin leaving it scented with the pure meditative Lavender. Rich in soothing properties, this toner instantly boosts the skin and reduces stress with its herbaceous fragrance.
Being a great anti-inflammatory and antibacterial, Lavender helps calm and refresh the skin, especially in cool and humid weather. Its calming property makes it perfect for irritated and sensitive skin prone to allergies and rashes. We also recommend Pure Vetiver Water for oily skin types.
Kama Ayurveda's Pure Mogra Water helps balance skin's pH, settle rashes, and provide relief from irritation and tone sagging skin.
The toner can also be used for DIY face and body masks, particularly for drier skin types. Mogra is best known as Sattvic (Life-giving, Transcendental, Pure) and Tridoshic. It is beneficial for regulating Vata, Pitta, and Kapha Doshas. The mysterious fragrance of Mogra is a Psychic Key that can increase mental receptivity to energy vibrations.
For Acne Prone Skin (Kama Ayurveda's Pure Rose Water)
Kama Ayurveda's Pure Rose Water is a decadent floral distillation that hydrates, tones, and refreshes skin, leaving it with the luxuriant scent of pure roses. Being a natural astringent, rose water helps balance and restore the skin's pH level and tighten pores. The antimicrobial and antiseptic properties of Rose help fight acne and pimples.
Spot treatments and serums are concentrated formulas specially designed to treat specific concerns like acne, wrinkles, and dark spots. Since they target to treat a particular concern, it is ideal for applying it right after toning.
Depending on your skin needs and concerns, you can choose between brightening, hydrating, or other types. Make sure you give time for the product to sink into the skin before going to the next step.
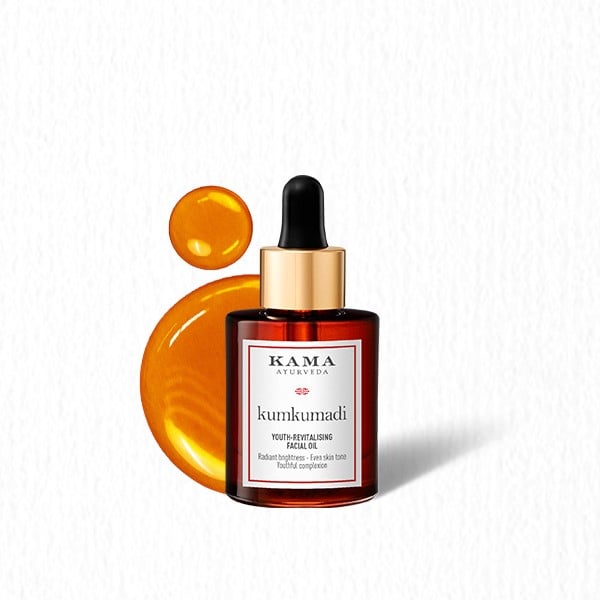
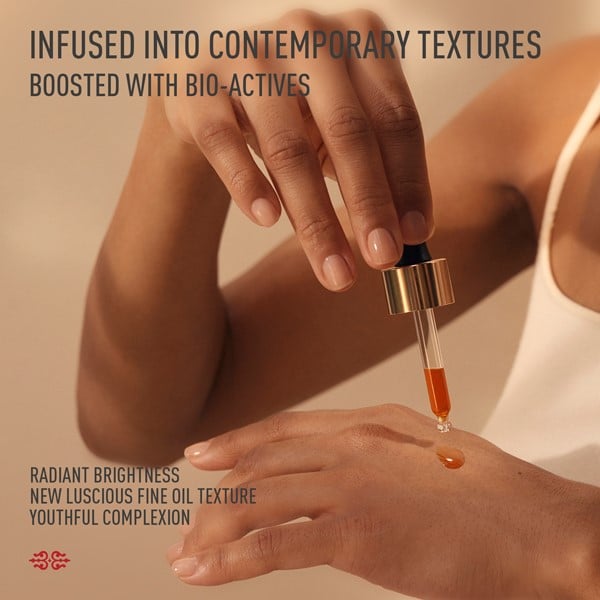
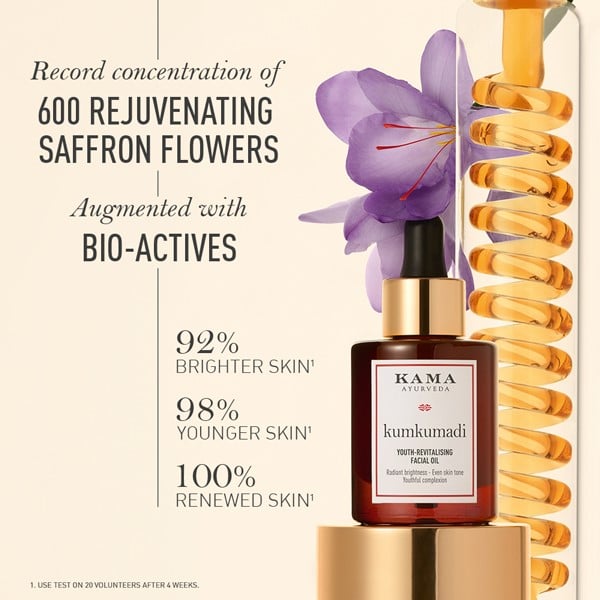
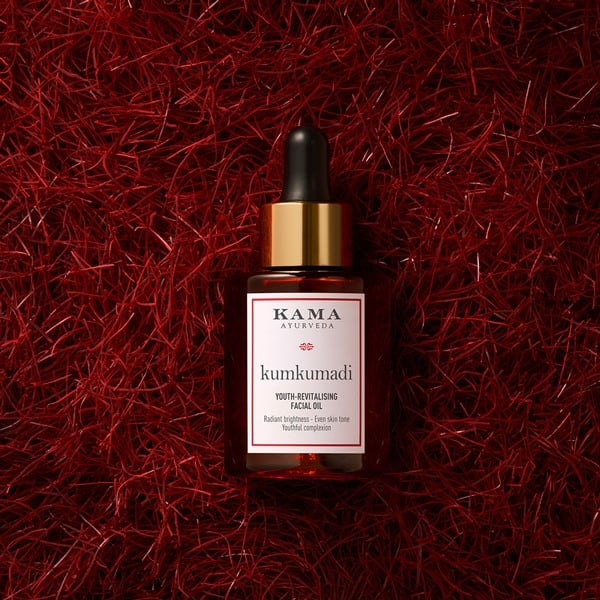
For Dull, Pigmented Skin - Kama Ayurveda's Kumkumadi Youth Revitalising Facial Oil
Kama Ayurveda's Youth-Revitalising Facial Oil is the complete age-defying facial oil to rejuvenate the skin and brighten complexion, enriched with the power of 600 rejuvenating Saffron flowers. Clinically proven to enhance 6 key youth indicators, this Kumkumadi Facial Oil delivers 6 visible skin benefits, offering a botanical, safe alternative to retinol for youthful, radiant skin.
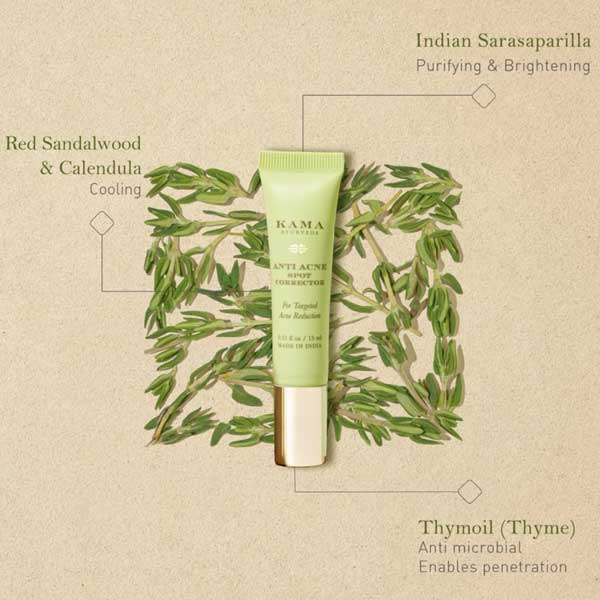
For Acne Spot Treatment - Kama Ayurveda Anti-Acne Spot Corrector
Kama Ayurveda Anti Acne Spot Corrector is an Ayurveda-derived formula designed to target blemishes and combat acne-causing bacteria . It not only addresses current acne but also helps prevent future breakouts, promoting clearer, healthier skin.
For Dark Circles - Eye Contour Renewal
Kama Ayurveda Eye Contour Renewal is an Ayurveda-inspired eye serum designed to rejuvenate and hydrate the eye area. You can use it at night to effectively reduce puffiness and dark circles .
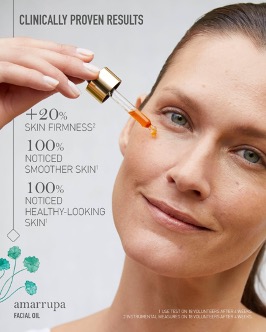
For Wrinkles And Sagging Skin - Amarrupa Wrinkle Repair & Firming Face Oil
This anti-ageing face firming oil reduces dark circles, fine lines, wrinkles, and other signs of aging to help you regain youthful, firm skin.
It’s rich in Oleic Acid, an Omega-9 fatty acid that replenishes lost moisture without clogging pores. Anti-ageing ingredients such as Carrot Seed Oil plump skin, reduce the appearance of wrinkles & fine lines and give you an even skin tone. It also has the anti-inflammatory and anti-ageing herb Centella Asiatica to stimulate skin's collagen production and repair skin damage.
CLINICALLY PROVEN EFFICACY
Skin smoothness +31%*
Skin firmness +20%*
100% noticed smoother skin**
100% noticed healthy-looking skin**
* INSTRUMENTAL MEASURES ON 18 VOLUNTEERS AFTER 4 WEEKS.
For Acne Spot Treatment - Kama Ayurveda Anti-Acne Spot Corrector
Kama Ayurveda Anti Acne Spot Corrector is an Ayurveda-derived formula designed to target blemishes and combat acne-causing bacteria. It not only addresses current acne but also helps prevent future breakouts, promoting clearer, healthier skin.
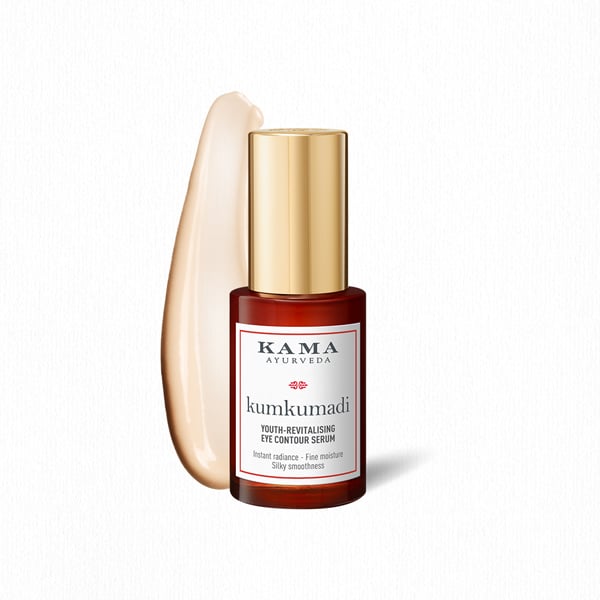
For Dark Circles - Kumkumadi Eye Contour Serum
Crafted with 98% natural-origin ingredients, this luxurious eye serum blends the wisdom of Ayurveda with modern skincare innovations. The formula is enriched with Kumkumadi oil, Polyglutamic acid, and Arjuna extract, known for their ability to rejuvenate and brighten the under-eye area.
Step 5: Moisturize
The final and the most impost step in your nighttime skincare routine is moisturizing. No matter your skin type, a moisturizer is a must if you want to wake up with supple and healthy skin every morning.
It’s also important to choose the right moisturizer depending on your skin type. For instance, if you have oily skin, opt for gel-based moisturizer as it will not clog your pores and doesn't feel heavy on the skin. (7) You may skip this step if you have used nourishing face oil in the previous step.
Our Recommendation - Kama Ayurveda's Kumkumadi Youth Recovering Night Balm
strengthen skin's natural barrier. Use nightly for replenished & radiant skin. The unique formula is blended with the finest saffron from Kashmir to brighten your skin and reduce dark spots and pigmentation.
For Wrinkles And Sagging Skin - Amarrupa Contour Defining & Firming Face Cream
Wake up to smoother, firmer skin with Kama Ayurveda's NEW & IMPROVED age-defying Amarrupa Wrinkle
Our new Amarrupa Contour Defining & Firming Cream is an ayurvedic formulation powered by Centella Asiatica (Gotu Kola), and plant-based Hyaluronic Acid that plumps skin & reduces wrinkles.
Shop Amarrupa Contour Defining & Firming Face Cream, made with 98% natural origin ingredients. Suitable for all skin types, including sensitive skin.
If you have extra time and want to indulge in skin care, apply a mask and wash it off between the second and third steps, at least once a week. Again, you can choose these masks depending on your skin needs and concerns.
If your skin feels dry, consider using a hydrating mask and if your skin is on the oily side, use a clay mask. You know there is a mask out there for every skin concern there is.
According to the directions given on each product, simply apply it for about 10 to 30 minutes and rinse clean with lukewarm water. Applying face masks not only makes your skin clearer and brighter but is also incredibly relaxing.
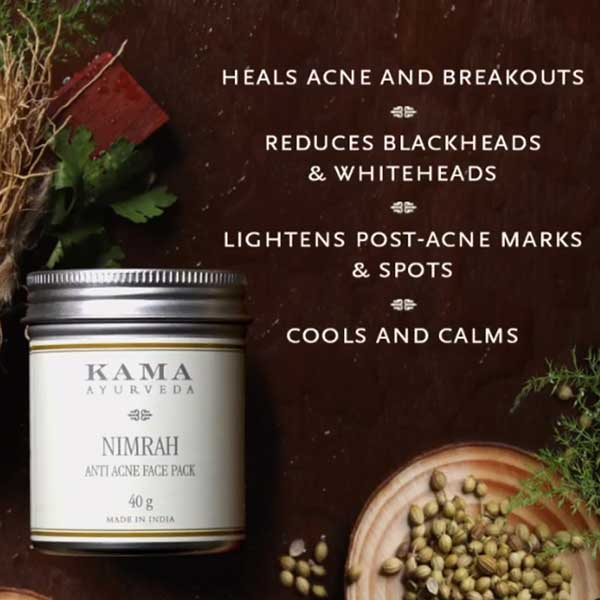
To Fight Back Acne - Kama Ayurveda's Nimrah Anti Acne Face Pack
Kama Ayurveda's Nimrah Anti Acne Face Pack is an anti-acne treatment that helps heal pimples and blackheads, repair inflammation, reduce scars, and improve skin tone. It is a completely natural blend of pure ingredients like Ashwagandha, Vetiver, Red Sandalwood, Lodhra, Coriander, and Liquorice.
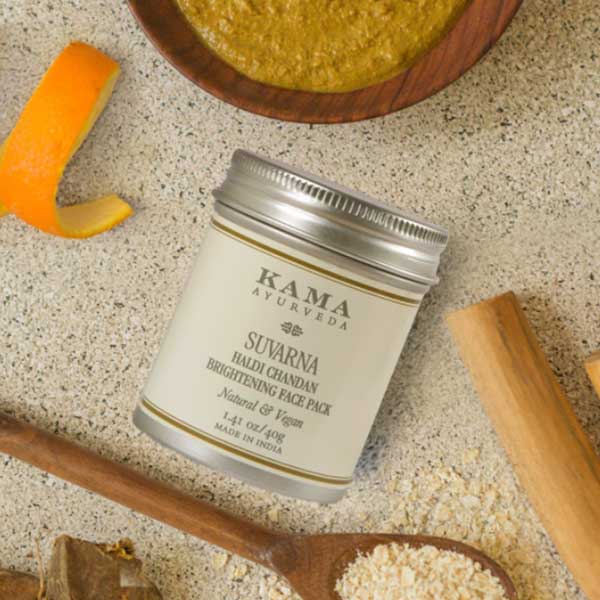
To Brighten Skin - Kama Ayurveda's Suvarna Haldi Chandan Face Pack
Kama Ayurveda's Suvarna Haldi Chandan Face Pack is a complexion-enhancing Ayurvedic face mask for smoothness, luminosity, and youthful vibrance. It is easy to use, delicate on the skin, and ideal for bi-weekly use.
Blended with pure ingredients like antibacterial Haldi (turmeric) and soothing, anti-aging Chandan (Sandalwood), the skin-illuminating face pack helps clarify and smoothen skin texture while reducing the intensity and frequency of acne and blemishes.
The natural astringent qualities of Rose help tone and tighten enlarged, open pores. Rich in antioxidants, the Orange Peel protects against premature skin aging due to environmental aggressors. It maintains a toned, supple, and younger-looking appearance.
To Smoothen And Tone Skin - Kama Ayurveda's Lavanya Natural Plant Mask
Kama Ayurveda's Lavanya Natural Plant Mask is a detoxifying and deep cleansing face mask that leaves skin toned, smooth, refined, and refreshed. The unique formulation of Sweet Flag and Liquorice extracts help deep cleanse, tone, smoothen, and even skin texture.
FAQs On Night Skin Care Routine
What Should I Include In My Night Skincare Routine?
Apart from the makeup remover, cleanser, toner, serum, and moisturizer, you can also include eye creams and lip balms to get better results.
At What Time Should I Do A Night Skincare Routine?
Some experts suggest doing the nighttime skincare routine just before we go to bed. However, in this case, we may end up having more moisturizer on the pillow than on our faces. Our skin needs at least 20 minutes to properly absorb the products into it.
Also, we should remove makeup and cleanse our skin immediately after getting back home. Later, you can space out applying your toner, serum, and moisturizer in intervals between your dinner and chores.
This way, you will be able to do the complete night skincare routine and provide it with all the nourishment it deserves during the night.
What Is The Difference Between Day And Night Skincare Routine?
While daytime skincare helps protect your skin from environmental aggressors, your nighttime skincare should focus on letting your skin unwind, relax, and repair. As your skin is known to absorb nutrients better while you rest, nighttime is ideal for using rich and nourishing skincare products that might feel too heavy and greasy for the daytime routine.
Some active ingredients in the products are known to react with the UV rays coming from the sun during the day and increase the skin's photosensitivity. So it is always advisable to use active products only at night. This is another notable difference between the day and night skincare routines.
Does Extra Sleep Make Us Look Younger?
Sleep relaxes your body. When the body is at rest, the cell and tissue repairing process gets activated, and collagen is produced. Therefore, getting enough sleep can make your skin look younger.
How Much Sleep Is Considered As Beauty Sleep?
Sleep helps your body, mind, and skin remain healthy. As it is called these days, beauty sleep must be at least 7 to 8 hours long.
Final Words
Just like how cleansing and applying sunscreen before stepping out are crucial for healthy skin, repairing the damage caused to your skin during the daytime at night is absolutely necessary.
If you want to wake up with skin that is glowing and beautiful, it is imperative to build and practice a regular nighttime skincare routine that cleanses, nourishes and replenishes your skin so that it will stay healthy all the time.
Kumkumadi Thailam has gained popularity as a miracle Ayurvedic oil to get glowing skin naturally. If you’re curious about this oil and want to know more before making it a part of your skincare routine, you will find this round-up of Kumkumadi Thailam reviews helpful.
Let’s walk you through what people are saying about Kumkumadi Youth-Revitalising Facial Oil by Kama Ayurveda. This popular Kumkumadi Facial Oil has attracted many awards over the last few years and it continues to be one of the best-selling products.
Kumkumadi Thailam Review by Makeup and Beauty Blog
Popular beauty blogger Rati at Makeup and Beauty quoted it as ‘absolutely great for skin’. After using it for several nights in a row, she noticed her skin brighten up. She claims that the oil is extremely rich and it nourishes her dry skin like no other facial oil. For this reason, she advises those with oily skin to only use the product as spot treatment.
“This is an amazing 100% Ayurvedic anti-ageing product. I mostly apply it at night and by morning my skin looks super soft, nourished and healthy. It’s almost like I had a facial last night. Since the texture is a bit sticky, you have to use only very little of it. It gets absorbed within a few minutes.”
Kumkumadi Oil Review by Bellatory Beauty Blog
Kumkumadi Miraculous Beauty Fluid Ayurvedic Night Serum by Kama Ayurveda product has changed pre-existing notions about oils for face skin. One might think that using oil on your face could never be a solution. But once you use this product, it changes that thought process.
“The product absorbs quickly, and I could see a difference in the pigmentation of my face. I would definitely recommend trying this product out. The good part is that it comes in a 3 ml bottle. Yes, the fragrance is a little overwhelming, but once you see the benefits of this serum, the fragrance becomes a secondary issue. I would give it a 4.5 out of 5 for its benefits and overall after effects.”
Kama Ayurveda Kumkumadi Oil Review by CosmoTales
“Kumkumadi Miraculous Beauty Fluid does illuminate the skin from within. It brightens up the under-eye area, your skin seems clearer and healthier. It works amazingly for skin dullness. My skin has now become so soft, bright and naturally glowing.
It definitely works to improve the appearance of dark spots and blemishes. But make sure that you use prescribed limits, as its highly concentrated Ayurvedic formulation could clog pores or even make them appear enlarged.”
Kumkumadi Thailam Reviews by Kama Ayurveda Customers
“The product actually does wonders to your skin. It’s one product with multiple benefits. My skin started looking younger after using it for 2-3 months.” - Amita
“After seeing all the positive reviews, I decided to buy the small pack. I went ahead with a second purchase of the large bottle after seeing positive results.” - Shivika
“Working more than 8 hours daily in a PPE / N95 really took a toil on my skin, bad acne with PIH, I have been using this for about 10 days now - not only have I not gotten any new breakout but it has also visibly diminished my hyper-pigmented marks. Just be careful use 2/3 drops on damp skin - as it’s highly concentrated so might clog pores for someone with oily skin” - PK
Kumkumadi Thailam Before And After Testimonies
“Writing this after using this serum for 3 months. I have acne prone skin and had many acne marks all over my face. I used it religiously every night. It has cleared out my skin to a great extent, and doesn't cause breakouts. I even clicked my skin before using it. So I can say this is assurance after seeing my before -after pics, that it works. Though, it takes some time to show results, but It actually works.” - Varsha
“The name says it all. This is a miraculous product indeed. I love it on my skin. Love the pure Ayurvedic fragrance it has. Reminds me of the oils used during my massage in Kerala. The smell is lovely and comforting. It most definitely has healing properties. I had a few cuts on my face and after using this it completely healed. It's soft and smooth on your face and you wake up in the morning with an elasticity and a spring on your skin after using this. Have just been using this for 15 days. I can feel its positive effects on my skin already so will continue with this as a night solution.” - Cathy
Is Kumkumadi Thailam Worth It?
“Until now I had the worst skin ever. But after using Kumkumadi Miraculous Beauty Fluid Ayurvedic Night Serum my skin texture has significantly improved. I trusted Kama Ayurveda for my sensitive skin and believe me it's a must to be added to your skincare regimen.” - Bhanu
“I absolutely love this night serum. It suits Indian skin so well. I have used a number of imported very expensive cosmetic products, but nothing has worked as well as this one. It has achieved everything the product claims - evens out skin tone, reduces dark circles, reduces fine lines. I have just been using it for 1 week but can already see the results. It’s a must have product!” - Sonal
“It is the most miraculous product I have used. Don't even need to use it daily, 4 times a week is enough. I'm middle aged now, in my youth I've used specially formulated lotions from Paris, nothing beats this. I'm writing this after my second bottle of kumkumadi. Follow the directions! That's important. My 50+ year old skin actually glows.” - Laxmi
Why Is Kumkumadi Oil So High In Price?
Kumkumadi Facial Oil has a high price tag that can be attributed to the exceptional quality of its ingredients and the complex process of creating it. One major reason for its cost is the use of Kashmiri saffron sourced from Pampore, which is known for being among the best saffron varieties available.
Kumkumadi’s potency is maximised with a unique two-fold concentration of saffron {Kumkum} following the traditional oil concoction method described in ancestral {vedas} texts. With noticeable improvement in skin’s youthful brightness, modern science reveals the miraculous benefits of{Kumkumadi}.
This Saffron is characterised by its deep color and strong aroma, and it contains potent compounds that offer significant benefits for the skin.
Kashmiri Saffron contains specific phytoactive molecules like crocin, safranal, and picrocrocin, which have antioxidant, anti-inflammatory, and skin-rejuvenating properties. These moleculesare highly concentrated with the purest and the reddest saffron from Pampore Kashmir and renews the skin at a cellular level.
The extraction process is meticulous and involves combining this Saffron with other rare and valuable ingredients, each chosen for its unique contribution to skin enhancement. This careful selection and combination of ingredients enhance the effectiveness of the oil.
The result is an oil that addresses various skin concerns and improves skin texture, thanks to the powerful combination of these potent compounds. Due to its reputation for delivering visible results and its association with luxurious skincare, Kumkumadi oil is priced higher to reflect its quality, effectiveness, and the craftsmanship involved in its creation.
Kumkumadi Thailam Clinical Trial Reviews
Prescribed in the ancient Ayurvedic text of Ashtanga Hrudaya, Kumkumadi Thailam is an essential beauty treatment for the face. Kama Ayurveda’s Kumkumadi Miraculous Beauty Fluid brightens & illuminates skin and delays signs of ageing.
It’s definitely a must-have skincare product for bright, radiant and rejuvenated skin. The product was awarded Best Anti-Ageing Serum by Elle Beauty Awards in 2017 and Best Face Serum by Cosmopolitan Awards in 2019.
Many factors can cause dry skin. From dosha domination to lifestyle habits such as indulging in hot showers to harsh winter weather and the natural decline of skin’s oils with age, the list of culprits is extensive. The good news? You don’t always need to consult a dermatologist to address dry skin. Often, the simplest solution lies in incorporating a natural moisturiser into your skincare routine. No matter your skin type—oily, dry, normal, or combination—using a moisturiser is an essential step to keep your skin hydrated, healthy, and balanced.
As per Ayurveda, dry skin type (also known as Vata skin), can be treated through adopting warming, moisturizing, and grounding practices. Dry skin requires daily nourishment and hydration.
How Does A Moisturizer Work?
Moisturizers attract moisture from the environment and retain it inside the skin to keep it soft and hydrated. They help in preventing loss of water from the topmost layer of the skin by stimulating ceramide production in the body.
Since the moisturizer gets deep into your skin, you need to be very particular while choosing the right one. There are endless recommendations for the best moisturizer out there in the market. But, we want you to choose a product that contains formulas containing the most indispensable types of ingredients which research proved to provide great results for all skin types. Take your pick from the following best moisturisers for dry skin and make sure they are the part of your daily skincare regimen. (1)
Plant Butters
Due to their occlusive and emollient properties, the basic function of plant butters is moisturization. They prevent moisture from evaporating by forming a protective layer on your skin. Protecting the top layer also helps in keeping irritants at bay and protecting your skin from cold winters.
Apart from moisturization, the essential fatty acids, vitamins, and antioxidants in plant butters deeply nourish your skin giving you smooth and soft skin. (2)
Types Of Plant Butters
There are various types of plant butters( Jojoba butter, Avocado butter, Macadamia nut butter, sal butter, Hemp butter, etc.) that can be used in all your skincare and haircare needs. But, below listed are the four most commonly used and easily available in skincare products.
Cocoa Butter
Extracted from cocoa bean pods, Cocoa butter is pale yellow in colour and contains Vitamin E, polyphenols (help fight free radicals). Its rich texture will leave your skin soft and moisturized. Cocoa Butter also helps fade stretch marks and scars. (3)
Mango Butter
Mango butter extracted from mango seeds has a sweet fragrance and is less greasy compared to shea and cocoa butter. It is a great source of fatty acids which help in moisturizing your skin, soothing irritated skin, and preventing fine lines and wrinkles. (5)
Kokum Butter
Kokum butter is made from Kokum trees (native to India) and has a light brown colour. Possessing a triglyceride composition, this butter has skin healing and moisturizing properties. It helps in treating dryness, healing ulcers, fissures, regenerating skin cells, etc. (6)
Shea Butter
Shea butter is extracted from the nuts of the African Shea tree. It is beige in colour and has healing properties. Vitamin A, E and phytonutrients in Shea butter help in fading blemishes, reducing inflammation and preventing dry skin. (4)
Organic oils or natural oils like olive oil, coconut oil, shea butter oil have been used in skin care and hair care for centuries for their various moisturizing, protective, and antibacterial qualities. The following is a list of the most popular organic oils. (7)
Coconut oil
Coconut oil is a great source of Vitamins E and K, antifungal, and antibacterial properties which not only moisturizes but smoothen, minimizes fine lines and wrinkles, calms temporary redness, and soothes irritated skin. Coconut oil acting as a sealant helps trap water into the skin to keep it moist all throughout the day. It can easily absorb into the skin. (8)
Olive oil
Olive oil derived from olives is a staple of the Mediterranean diet. Not only does the oil have many nutritional benefits when consumed, but it also is frequently applied to the skin and hair. It acts as an antioxidant that prevents premature ageing by fighting the free radicals present in the skin. Rich in Vitamins A, D, E, and K, and antibacterial properties, olive oil helps in smoothening skin, minimizing fine lines and wrinkles, and soothing bacterial infections. (9)
Jojoba oil
Jojoba oil is excreted from the nuts of the jojoba plant. Many people use jojoba oil as part of their skincare routine for many reasons. It works to seal the skin with a protective barrier which helps it from losing moisture. Apart from moisturizing your skin, you can use jojoba oil to treat acne, psoriasis, and countless other skin conditions. The Vitamin E in jojoba oil acts as an antioxidant that helps the skin fight oxidative stress caused by pollutants and other toxins. (10)
Almond oil
Almonds aren’t just for healthy snacking, in fact, this nutty oil benefits your skin in various ways. Ayurvedic and ancient Chinese have always used almond oil to help soften and soothe the skin. Along with moisturizing your skin, this oil also reduces puffiness and under-eye circles, improves complexion and skin tone, treats acne, helps reverse sun damage, and reduces the appearance of scars and fine lines and stretch marks. (11)
Rosehip seed oil
Rosehip seed oil is derived from the Rosa Canina rose bush that is grown mostly in chile. It is a dry or nongreasy oil which makes it a great natural moisturizer for all skin types (12). The essential fatty acids, including linoleic and linolenic acid in Rosehip seed oil, keep cell walls strong so that they don’t lose water. Rosehip oil also exfoliates and brightens skin, boosts collagen formation, reduces inflammation, scars, fine lines, and hyperpigmentation, and protects against sun damage.
3. Honey
For centuries, honey has been considered an integral part of our lifestyle. Right from being used for cooking purposes to being used for the treatment of numerous illnesses and diseases, the credibility and reputation of honey as a magic potion for the overall health of the body (both external and internal) has remained unwavering. As a powerhouse of various nutrients, honey is a favourite ingredient for dieticians, nutritionists, beauty experts, etc.
The reason why honey is used as a base ingredient for almost all homemade DIY treatments is that it deeply moisturizes the skin from deep within. Applying honey to your skin regularly gives you results that are beyond your imagination, your skin looks healthy, younger-looking and glowing. It acts as a pore cleanser, an exfoliator. Honey lightens scars, fights acne and pimples, reduces wrinkles, brightens skin complexion, prevents premature ageing, and adds a natural glow. (13)
4. Aloe Vera
The modest houseplant, Aloe Vera is a ‘miracle and wonder plant’ that has been around and used as a medicinal herb. It helps in nourishing the body from the inside. Its gel is widely used to enhance one’s skin, mainly the face and the hair. The following are the skin reasons why Aloe Vera can be the best ingredient in your moisturizer.
Aloe Vera has great moisturizing properties that help treat dry skin. When used as an aftershave treatment, aloe vera helps in keeping the skin hydrated and healing burns by razor, and smaller nicks and cuts.
The cooling and anti-inflammatory properties of aloe vera help soothe sunburn.
It is a known fact that aloe vera helps reduce the time of healing mainly in the case of first and second-degree wounds. This is because aloe vera penetrates into the skin way faster than the water itself.
Rich in Vitamins C, E and beta-carotene, Aloe Vera fights skin ageing and lightens blemishes on the face.
Aloe Vera with great antibacterial and antiseptic properties helps in treating infections and acne too. (14)
Coconut oil is considered one of the most effective natural ingredients for the skin. It is used as a cleanser, moisturizer, makeup remover, and the list goes on and on. But, did you know there is another part of this tropical fruit that you are missing out on? The coconut milk benefits for the skin is just as good or maybe even better than the oil. Coconut milk is packed with many healthy skin oils and antioxidants that help the skin in numerous ways. It is a lot less greasy and has a more subtle scent when compared to coconut oil.
The nutrient-dense milk helps in locking in the hydration and smoothing out the skin. You often find coconut milk as a primary ingredient in dry skin-saving moisturizers. Coconut milk, just like its oil-based cousin, works as an effective cleanser for removing dirt and debris from the pores while deeply nourishing the skin. It also replenishes healthy oils and antioxidants (including Vitamin C) into the skin.
If the skin on your face, hands, legs and anywhere else in the body is feeling raw and red, then coconut is definitely your go-to remedy. Coconut milk leaves skin soft and supple due to the presence of soothing and moisturizing properties in it. (15)
6. Essential Oils
For centuries, many cultures have used essential oils to enhance their daily lives, support wellness, perform religious rites, and wear them as perfumes. Not only are these essential oils versatile but also are used for beautifying the skin. Essential oils with their natural properties brighten, smoothen, and moisturize the skin in a way that leaves you feeling perfectly pampered. (16)
Lavender Oil - Lavender essential oil is a perfect way to treat dry skin. It soothes, smoothens, and nourishes all skin types and is very easy to include in your skincare routine.
Cedarwood oil - The Cedarwood essential oil has a woodsy scent and is extracted from many varieties of cedar and Juniper trees. It has many potential uses and prevalent among these is its great ability to moisturize and nourish the skin. It can also be used as a treatment for acne, blackheads, whiteheads, etc.
Tea Tree oil - Tea tree essential oil treats dry skin by reducing irritation and itching. It has also been shown to be more effective than clobetasone butyrate and zinc oxide to treat eczema. Several studies have shown that tea tree oil can be a powerful weapon against acne (17). It helps in reducing the amount and overall severity of acne.
Ylang Ylang oil - Ylang-Ylang essential oil has hydrating properties that help you in maintaining the skin’s oil production and keeping it well-nourished. The natural antiseptic properties in Ylang-Ylang oil can also heal any kinds of cracks or cuts caused by dry skin. Overall, this essential oil helps in moisturizing, replenishing the skin while keeping it healthy.
The following are a list of Kama Ayurveda’s moisturizers that can keep your dry skin at bay.
1. Day Cream For Women with Dry Skin
Kama Ayurveda’s Eladi Hydrating Ayurvedic Face Cream is a truly nourishing day cream that promises to moisturize, soften, smoothen and protect your skin. This Ayurvedic formula is prescribed in the ancient Ayurvedic text of Ashtanga Hrudayam as the ideal skin treatment. It is made with pure ingredients such as Coconut Milk, Sesame Oil, Costus etc.
Aloe Vera present in the blend is a great source of antiseptic properties that helps to prevent acne, blemishes, fine lines and gives sufficient sun protection. Olive oil contains large amounts of antioxidants and enables high skin absorption without stickiness or heaviness. Pure essential oils extracted from rose and Jasmine nourish the skin for healthy, glowing, and younger-looking skin. The Green Cardamom present in this cream is aromatic in nature. It is anti-microbial and has the ability to soothe inflammatory symptoms on the skin.
Sesame seeds are used in health treatments and massages for the body. It is a great remedy for migraine and insomnia. Sesame seeds are the best remedy for relieving anxiety while working as a natural moisturizer. Coconut oil works in keeping the skin smooth and soft. It helps to prevent early ageing and wrinkling of the skin.
Benefits:
Eladi hydrating ayurvedic face cream is 97.5% natural
It helps to keep the skin soft and smooth.
This hydrating ayurvedic cream nourishes the skin without any greasiness.
It is a great source to minimize premature ageing.
How To Apply?
Take enough of the cream and massage gently on the skin in upward directions.
2. Night Cream Cream For Women with Dry Skin
Kumkumadi Youth Recovering Night Balm is a saffron-infused balm designed to restore and rejuvenate your skin overnight. With 97% natural origin ingredients, this rich, enveloping formula is free from controversial ingredients and artificial fragrances, making it safe for all skin types, including sensitive skin. Infused with Kumkumadi Oil, brightening Licorice Oleoactive®, and nourishing Shea Butter, it provides intense hydration and replenishment. The cream also features Recovering Ceramides III and plant-based Squalane, supporting skin recovery and leaving you with a revitalised complexion by morning.
Benefits:
Clinically proven to enhance skin texture, it targets signs of ageing, dullness, and uneven skin tone, ensuring a rested, youthful look.
The cream’s restorative properties work overnight to replenish your skin, offering a smoother, more radiant complexion each day.
How to use it?
After cleansing, moist your skin with a water-based toner or pure rosewater. Apply Kumkumadi Youth Recovering Night Balm in small amounts on the face and neck and then massage with upward strokes until absorbed (avoid eye area.
Another option to try is Kama Ayurveda's NEW Urjasara Nourishing & Replenishing Rich Cream. Enriched with bio actives like Indian Beautyberry and Ceramides III, this replenishing cream deeply hydrates, strengthens, and restores fragile or mature skin for a soft matte radiance and long-lasting comfort. Use nightly for replenished & restored skin.
Benefits:
Brightening Liquorice Oleoactive® and restoring Danomega™ Omega 3 & 6 enhance skin texture and radiance, promoting a luminous matte finish without greasiness.
Clinically proven to deliver remarkable results, 100% of users noticed nourished skin, and 94% experienced a silky glow.
How to use it?
Apply appropriate amount to face, neck and décolletage after cleansing massage with upward strokes (avoiding the eye area), until absorbed.
Beauty Tip: Enrich your moisturiser with 1-2 drops of Urjasara facial oil to maximum hydration in colder months.
5. Moisturising Natural Sunscreen For Dry Skin
Kama Ayurveda’s Natural Sunscreen Protection is a non-chemical daily-use sunscreen that provides full-spectrum sun protection. It boosts hydrating while keeping skin even-toned and healthy. This sunscreen is a light formula that contains natural-origin, UV protection minerals like Zinc Oxide and Titanium Dioxide that reflect the sun rays back from the exposed areas of skin.
The natural Glycerine and Olive Oil in Natural Sunscreen Protection condition the skin without making it greasy. The Shea Butter in the blend nourishes, soothes irritation, repairs sunspots and other signs of sun damage. Pure essential oils of Lime, Ginger, Nutmeg leave the skin smooth, soft, light and freshly scented.
Benefits:
Kama Ayurveda’s Natural Sunscreen Protection is 93.3% natural.
This sunscreen is SPF 21 and PA++ sun protection.
The non-Nano Formulation of this sunscreen prevents skin penetration for safe and long term use.
It is safe for children above three years of age, gentle, non-comedogenic and suits sensitive and oily skin.
How To Use?
Shake well and take an appropriate amount onto your palm. Blend into all exposed areas until it gets absorbed. Always use sunscreen as the last step in your skincare routine. Apply 20 minutes before sun exposure and reapply every two hours.
6. Kokum and Almond Body Butter For Dry Skin
Kama Ayurveda’s Kokum and Almond Body Butter is a luxurious, creamy and rich body cream that gives intensive hydration instantly. It keeps skin soft, smooth and protected. This natural blend is enriching body butter made with 100% organic cold-pressed coconut oil and almond oil.
Kokum and Almond Body Butter which is rich in Vitamin A, E, fibre and minerals relieve dryness and have natural oxidants to increase the elasticity of the skin. Blended with cocoa butter, shea butter and kokum butter, this ayurvedic formula rejuvenates skin cells and lightens stretch marks. Aloe Vera juice in it is an antiseptic agent that helps in protecting the skin. Overall Kokum and Almond Body Butter is an intensive moisturizer that moisturizes, hydrates, and improves skin tone while reviving its natural glow.
Benefits:
Kama Ayurveda’s Kokum and Almond Body Butter is 92.3% natural.
It helps in relieving dryness instantly, improving skin tone and lightening stretch marks.
The formula also helps in healing roughness and scarring.
And obviously, this blend has great moisturizing properties.
How To Apply?
Apply the product all over the body and massage mainly concentrating the rough areas like elbows and knees. You can reapply whenever your skin feels dry, tight and uncomfortable.
7. Rose And Jasmine Body Moisturizer For Women with Dry Skin
Kama Ayurveda’s Rose and Jasmine Body Moisturizer is a balancing and restoring body moisturizer that helps in conditioning your skin and repairing the damage. It is a luxurious body moisturizer that is free of paraben, petrochemicals and SLES (sulphates). While hydrating, the moisturiser also keeps its natural oils intact to leave skin soft and radiant.
Rose and Jasmine Body Moisturizer contains Aloe Vera juice that helps in penetrating deeper into the skin to deliver essential nutrients thereby softening, conditioning and reducing damage. The lemon and beetroot extracts condition skin naturally and brighten up the complexion. The pure essential oils of Rose and Jasmine promises to repair and soothe, brighten and soften skin.
Benefits:
Kama Ayurveda’s Rose and Jasmine Body Moisturizer is 99.8% natural and is SLES and paraben-free.
The blend is anti-inflammatory and helps in balancing and brightening up the skin tone.
Not to mention, Kama Ayurveda’s Rose and Jasmine Body Moisturizer deeply moisturizes and hydrates skin.
How To Apply?
Take a generous amount into your hands and using your fingertips, gently massage the face and neck in circular motions until the product absorbs completely.
8. Himalayan Deodar Body Moisturizer For Men With Dry Skin
Kama Ayurveda’s Himalayan Deodar Body Moisturizer is a soothing and softening body lotion with an abundance of anti-inflammatory properties that protect and deeply moisturize the skin. This luxurious body moisturizer is free of SLES (Sulphates), petrochemicals and paraben. It is formulated to hydrate skin while keeping the skin radiant and soft.
Kama Ayurveda’s Himalayan Deodar Body Moisturizer is blended with Aloe Vera juice that is a source of anti-inflammatory properties to protect and deeply moisturize your skin. The Beetroot and Lemon extracts brighten the complexion and the pure essential oils will help keep your skin refreshed, healthy and toned.
Benefits:
Kama Ayurveda’s Himalayan Deodar Body Moisturizer is 99.8% natural and free of SLES and paraben.
It is anti-inflammatory and deeply moisturizes your skin giving you healthy and younger-looking skin.
The moisturizer clears and brightens your skin.
How To Apply?
Take a generous amount of the product and using your fingertips, massage gently in circular motions until it gets absorbed completely.
9. Lavender Patchouli Body Moisturizer For Dry Skin
Kama Ayurveda’s Lavender Patchouli Body Moisturizer is a perfect moisturizer to relax, nourish and hydrate the skin. The rich formula will transform your dry skin by sealing in a rich blend of lipids and soothing ingredients to nurture and nourish your skin.
Kama Ayurveda’s Lavender Patchouli Body Moisturizer is infused with extracts of sunflower, Aloe Vera, and Olive Oil to add essential nutrients and moisture to the skin. The soothing Lavender essential oils help in calming skin to heal infections and irritation. The refreshing Patchouli oil will act as a natural antiseptic, anti-inflammatory, and antibacterial active that gives you comfort, smooth, and well-hydrated skin.
Benefits:
Kama Ayurveda’s Lavender Patchouli Body Moisturizer is 85.9% natural.
It relieves dryness and discomfort leaving you soothed and well-nourished skin.
Lavender Patchouli Moisturizer is known to calm tightness and irritation.
How To Apply?
Take a generous amount of Kama Ayurveda’s Lavender Patchouli Body Moisturizer into your palms. Using your fingertips, massage gently in circular motions until the product gets absorbed completely.
10. Rose and Jasmine Moisturising Body Oil for Dry Skin
Kama Ayurveda’s Rose Jasmine Bath and Body Oil is an indulgent and quickly absorbed body oil that will leave your skin feeling smoother, softer, and well-nourished. This luxurious floral oil is a blend that can be used as a post or pre-bath hydrator.
Kama Ayurveda’s Rose Jasmine Bath and Body Oil contains pure essential oils of Jasmine and Rose along with Organic Almond Oil, Wheat Germ Oil, Soya Bean Oil, and Castor Oil. Rich in Vitamins A, D & E, minerals, regenerative and antioxidant properties, this ayurvedic formula helps restore the natural glow of the skin.
Benefits:
Kama Ayurveda’s Rose Jasmine Bath and Body Oil is 100% natural.
It promises to soften and hydrate the skin leaving it healthy and younger-looking.
The formula is non-greasy.
How To Apply?
Kama Ayurveda’s Rose Jasmine Bath and Body Oil is light, quick-absorbing and is suited for everyday use.
Before you bathe, gently massage the product into your skin and leave it on for about 10 to 15 minutes. Then rinse clean with a mild body cleanser. Or you can also add 10 to 15ml of Rose Jasmine Bath and Body Oil to your bath water for a relaxing bath.
If you want to use the oil post-bath, you can take an appropriate amount on your palms and gently massage it all over the body.
Kama Ayurveda’s Organic Sweet Almond Oil is a natural, pure and organic oil treatment that promises to hydrate and smoothen your skin from head to toe. This gentle and light conditioning treatment with a delicate sweet smell is extracted from the ripe seeds of the Almond tree. Rich in Vitamins A and E, the sweet almonds nourishes and improves complexion while reviving the skin’s natural glow.
The organic Sweet Almond Oil promises to lighten dark circles, marks and spots. It can be used for delicate, sensitive and irritated skin types.
Benefits:
Kama Ayurveda’s Organic Sweet Almond Oil is 100% organic and natural, cold-pressed oil. It is ideal for body massages.
The oil is fast-absorbing, non-sticky and excellent for baby massages.
It smoothes, brightens and improves skin complexion.
Take a small amount of the oil and warm it in your hands. Then massage gently all over the face and body and leave it on for 30 minutes. Rinse clean with a mild body cleanser or soap.
Kama Ayurveda’s Organic sesame oil is a great massaging oil that helps in repairing damaged skin and also works as a great absorbent. This sesame oil is a pure, natural, and organic oil treatment that nourishes and smoothes skin from head to toe.
Organic sesame oil is light and soothing. It promises to repair damaged skin while giving it a healthy glow. Rich in nutrients, vitamins A, B, E and minerals, this oil penetrates deep into the skin to give soft, smooth, radiant, and younger-looking skin you have ever dreamt of. The best part is this oil also increases blood circulation. Organic sesame oil helps in preventing your skin from tanning and protecting you from the damage caused by harmful UV radiation.
Benefits:
Organic sesame oil is 100% organic and natural.
The Kama Ayurveda’s Organic Sesame Oil revitalises and smoothes skin.
It absorbs fast.
How to Apply?
Take a small amount of oil in the hands and then massage gently all over the face and body. Leave it on for about 20 to 30 minutes, cleanse, rinse clean with a mild soap or body cleanser. This oil can be used by any skin type from head to toe.
Extra virgin organic coconut oil is a highly versatile oil that deeply conditions both skin and hair. This organic oil is an ideal moisturizer for the body. It makes the skin soft, smooth and even textured. Coconut oil is very effective for a conditioning treatment. This ayurvedic blend is highly advised for baby massages.
Benefits:
Extra virgin organic coconut oil is 100% pure and natural.
It helps in smoothing the skin and giving you an even skin tone.
It is non-sticky and absorbs very fastly.
How To Apply?
Take a small amount of coconut oil in the hands and massage all the face and body. After applying leave it on for 20 to 30 minutes, then rinse clean with body cleanser or mild soap. This organic coconut oil can be used for all skin types.
Kama’s Pure and Organic Moringa Oil offers a boost of natural hydration for your dry skin. Extracted from the seeds of the Moringa tree, this cold-pressed Organic Moringa Oil deeply hydrates, restores the skin’s protective barrier, leaving the skin smooth and nourished.
This video shows how you can use Moringa oil to provide a deep nourishment to your body.
12. The effectiveness of a standardized rose hip powder, containing seeds and shells of Rosa canina, on cell longevity, skin wrinkles, moisture, and elasticity - https://www.ncbi.nlm.nih.gov/pmc/articles/PMC4655903/
When it comes to skincare, the terms "hydration" and "moisturisation" are often used interchangeably. But did you know they serve different functions for your skin? Both are essential for a healthy, glowing complexion, but understanding their unique roles can help you build a more effective skincare routine.
Urjasara, with its thoughtfully crafted Ayurvedic formulas, bridges the gap between hydration and moisturisation, ensuring your skin gets everything it needs to look and feel its best. Here's a closer look at why both hydration and moisturisation matter and how Urjasara’s dual-action products can transform your skin.
Why Both Hydration and Moisturisation Matter
Imagine your skin as a sponge. For it to remain soft, smooth, and plump, it needs water (hydration) to stay saturated and oils (moisturisation) to keep the water locked in. Skipping either step can lead to dull, dry, or imbalanced skin.
By addressing both hydration and moisturisation, you can maintain optimal skin health, repair the barrier, and achieve that coveted radiant glow. Let’s break down what each term really means and how they work together.
Skin Hydration, Explained
When it comes to skincare, hydration is all about boosting your skin’s water content. Dehydrated skin lacks water, leading to tightness, dullness, and a lack of elasticity. Hydrating products typically contain humectants like hyaluronic acid, glycerin, or aloe vera, which draw moisture into the skin.
When your skin is well-hydrated, it appears plump, smooth, and radiant. Hydration is crucial for maintaining a youthful appearance and preventing fine lines and wrinkles caused by dehydration.
Skin Moisturisation, Explained
While hydration focuses on water content, moisturisation is about locking that water in and reinforcing the skin’s protective barrier. Moisturisers are usually oil-based or contain emollients and occlusives, such as shea butter, ceramides, or plant oils, which prevent water loss and keep your skin soft and supple.
Without proper moisturisation, your skin barrier can become compromised, leading to dryness, irritation, and an increased risk of environmental damage.
Urjasara’s Dual-Action Approach
Urjasara’s range of Ayurvedic skincare products is designed to address both hydration and moisturisation, ensuring your skin is healthy, plump & resilient. Each product in the Urjasara collection is powered by the synergy of Ayurvedic botanicals and scientifically proven ingredients, delivering visible results.
Hydration with Urjasara:
Hyaluronic Acid: A powerhouse humectant that attracts and retains water, plumping up the skin and reducing dehydration. Find plant-based hyaluronic acid in Kumkumadi Silky Serum, Urjasara Milky Essence and Urjasara Water Cream.
Amiporine™ (Pomegranate Extract): This bio-ingredient stimulates the water canals of the skin (also called aquaporins) to ensure evenly distributed hydration. Find Amiporine™ in Urjasara Milky Essence, Urjasara Water Cream and Urjasara Rich Cream
Moisturisation with Urjasara:
Ceramides III: Ceramides help cement skin cells and lock the skin barrier preventing transepidermal water loss and recover a smooth, youthful skin. Find it in Kumkumadi Night Balm, Urjasara Rich Cream.
Shea Butter: Nourishes and softens the skin, restoring its natural resilience. Find it in Kumkumadi Night Balm, Urjasara Rich Cream & Amarrupa Contour Defining & Firming Cream.
Liquorice Oleoactive®: Repairs and soothes while brightening the complexion. Find it in Urjasara Collection and Kumkumadi Collection.
With clinical results like +83% hydration from the first use and 93% more resilient skin in four weeks, Urjasara’s dual-action formulas are a testament to the power of combining hydration and moisturisation in a single routine.
How to Incorporate Urjasara for Plump, Healthy Skin
For optimal results, follow a simple, dual-action skincare routine:
Cleanse: Start with a gentle cleanser like Rose Jasmine Face Cleanser to remove impurities without stripping the skin of its natural oils.
Boost: Prep your skin with Urjasara Milky Essence for instant hydration.
Hydrate: Use Urjasara Water Cream or Urjasara Rich cream to infuse your skin with moisture.
Regenerate: Lock in hydration with a few drops of Urjasara Facial Oil
Protect: Finish with sunscreen (Natural Sun Protection) to safeguard your skin barrier.
Glowing skin is a universal beauty goal, yet achieving it often feels challenging. Modern skincare routines are filled with countless products promising radiance, but not all deliver lasting results. Kama Ayurveda’s NEW Kumkumadi Youth-Illuminating Face Serum—a breakthrough formula designed to provide instant glow, deep nourishment, and long-term rejuvenation.
Crafted with the power of pure Saffron, illuminating mineral particles, plumping Hyaluronic Acid, and energising Creatine Amino Acids, this serum redefines how you achieve radiant skin. A botanical alternative to most Vitamin C serums in the market, let’s explore why this glow boosting serum deserves a spot in your skincare routine.
Kumkumadi Face Serum: A Botanical Alternative to Vitamin C
Vitamin C is a popular ingredient in brightening serums, but for those with sensitive skin, it can sometimes cause irritation or redness. The Kumkumadi Serum offers a gentle yet powerful alternative, delivering the same radiance-boosting effects through natural botanicals like:
This makes the Kumkumadi Serum the perfect Ayurvedic replacement for Vitamin C serums, offering glow-enhancing benefits without irritation.
What Makes the Kumkumadi Serum Unique?
Unlike conventional serums, Kama Ayurveda’s Kumkumadi Youth-Illuminating Face Serum blends Ayurvedic wisdom with modern skincare science to deliver unparalleled results. Launched after the success of our bestselling Kumkumadi Youth Revitalising Facial Oil, here’s what you need to know about the Kumkumadi Face Serum.
Key Features:
Infused with Kumkumadi Oil – A time-honored Ayurvedic elixir known for its brightening and healing properties
Instant Glow Effect – Features illuminating mineral particles for an immediate radiance boost
Hydrating & Plumping – Enriched with Hyaluronic Acid to deeply hydrate and smooth skin
Skin Energising – Powered by Creatine Amino Acids to boost cell vitality and refresh dull skin
98% Natural-Origin Ingredients – Free from controversial additives, synthetic fragrances, and harsh chemicals
Sustainable Packaging – Comes in a 100% recyclable glass container with eco-friendly packaging
Designed for all skin types, including sensitive skin, this clinically proven, dermatologically tested serum ensures a luminous, youthful complexion without irritation.
Why Modern Skin Needs the Kumkumadi Serum
Daily exposure to pollution, UV rays, and stress can lead to dullness, uneven skin texture, and premature ageing. The Kumkumadi Face Serum addresses these concerns with multi-action benefits:
1. Deep Hydration & Plumping
Hyaluronic Acid retains moisture, making skin look smooth and supple
Helps prevent dryness-induced wrinkles and fine lines
2. Instant & Long-Term Glow
Enriched with Saffron that is a natural source of Vitamin A (Retinoid) and Vitamin C (known for brightening properties) & illuminating minerals provide an instant brightness boost
Regular use evens out pigmentation and enhances skin tone
3. Anti-Ageing & Skin Revitalization
Creatine Amino Acids energize skin cells, combating fatigue and dullness
Encourages cell renewal for fresher, younger-looking skin
4. Non-Greasy & Lightweight Formula
Absorbs quickly, leaving no residue
Works beautifully under makeup for a dewy, fresh look
What Is a Serum and How Is It Different from Face Creams and Oils?
Many people wonder how serums fit into their skincare routine. Here’s how they differ from creams and oils:
Face serums are lightweight, fast-absorbing formulas with a high concentration of active ingredients. Formulated for specific concerns (brightening, hydration, anti-ageing), the unique texture penetrate deeper into the skin for targeted treatment.
Specifically designed for the area most exposure to the sun and other environmental factors, face creams are emulsions (either water or oil-based) and have a thicker consistency than serums. They are designed to moisturise and seal hydration and form a protective barrier over the skin.
Face oils are one of the most potent forms of experiencing Ayurvedic beauty. Rich in nourishing botanical extracts, ideal for locking in moisture and softening the skin. Best suited for dry or mature skin types.
For best results, start with a cleansed, damp face and apply Kumkumadi Serum, followed by a face cream (Kumkumadi Soft Cream or Kumkumadi Night Balm). For night use, apply Kumkumadi Facial Oil to revitalise and repair the skin as you sleep.
The skincare world is constantly evolving, and with it, our approach to hydration has been redefined. As beauty enthusiasts increasingly demand products that deliver quick results without sacrificing luxury, water creams (also known as gel creams) have emerged as the ultimate solution. These lightweight moisturisers are lightweight, fast-absorbing, and deeply hydrating, making them a game-changer for all skin types. Among these is Kama Ayurveda’s NEW Urjasara Water Cream, a luxurious Ayurvedic formula designed to replenish moisture, restore the skin barrier, and leave your skin radiant.
A New Era: From Traditional Creams to Water Creams
For years, traditional oil-based moisturisers were the gold standard for hydration. While effective, their heavy textures often left a greasy residue—particularly unsuitable for hot, humid climates or oily skin types. Enter water creams: feather-light, gel-like formulations that absorb effortlessly into the skin.
Unlike conventional creams, water creams offer intense hydration without feeling heavy or clogging pores. Their innovative texture is perfect for layering with other skincare products, making them versatile and practical for everyday use.
Why Water creams Are the New Hydration Heroes
Water creams have skyrocketed in popularity because they address the modern skincare dilemma of achieving deep hydration without any greasy residue or a film. Their benefits include:
Lightweight texture: Perfect for daily use and comfortable for all skin types.
Fast absorption: No greasy residue, just refreshed, hydrated skin.
Deep hydration: Packed with water-binding ingredients like hyaluronic acid for smooth, plump skin.
For oily and combination skin types or anyone in warm climates, water creams like Urjasara Water Cream are ideal choices. They cater to the growing trend of lightweight moisturisers that deliver results without compromising the skin’s natural balance.
What is a Water Cream, and How is It Different?
Water creams, sometimes called gel creams, are water-based moisturisers with a high concentration of hydrating ingredients. Unlike heavier, oil-based formulas, water creams offer a non-greasy, lightweight alternative that feels refreshing on the skin.
Key ingredients like hyaluronic acid, glycerine, and aloe vera make water creams incredibly effective at locking in moisture while maintaining a smooth, non-sticky finish. Whether you have oily skin, live in a humid climate, or simplyprefer lighter products, water creams are a must-have for hydrated, glowing skin.
Urjasara Water Cream: A Perfect Blend of Ayurveda and Innovation
Among the leading water creams is Urjasara Water Cream by Kama Ayurveda—a product that combines ancient Ayurvedic wisdom with cutting-edge skincare science.
This 97% natural-origin formula is clinically proven to increase hydration by 80% after just one use. Its powerful blend of botanical actives includes:
Hyaluronic Acid: Delivers intense hydration and a plumping effect.
Amiporine™ and Danomega™ (Omega 3 & 6): Repair and strengthen the skin barrier for long-lasting moisture.
Liquorice Oleoactive®: Brightens the skin, promoting a natural, radiant glow.
After four weeks of use, 90% of users noticed a fresh glow, while 83% felt their skin was visibly plumper. Dermatologically tested and free from artificial fragrances, it’s suitable for all skin types—including sensitive skin.
How Water Creams Help Support Your Skin Barrier
Your skin barrier is the outermost layer of your skin, responsible for locking in moisture and keeping irritants out. A weakened barrier can lead to dryness, irritation, and sensitivity. Water creams like Urjasara play a key role in maintaining and repairing this barrier.
To support your skin barrier, avoid harsh products that strip natural oils and prioritize moisturisers rich in hydrating and replenishing ingredients. The Urjasara Water Cream delivers on all fronts, helping your skin stay resilient, smooth, and nourished.
How to Incorporate Water Creams into Your Routine
Maximize your hydration game with this step-by-step routine:
Cleanse: Use a gentle cleanser like Rose Jasmine Face Cleanser to prep your skin.
Tone: Follow up with Pure Rose Water to balance your skin’s pH.
Boost: Apply Kumkumadi Silky Serum or Urjasara Milky Essence for an extra layer of hydration.
Moisturise: Massage Urjasara Water Cream onto your face, neck, and décolletage until fully absorbed.
Beauty Tip: Dab a small amount on the high points of your face for a subtle, dewy glow.
Water creams are the ultimate blend of lightweight luxury and powerful hydration, meeting the needs of modern skincare enthusiasts. With its Ayurvedic-inspired formulation and proven efficacy, Urjasara Water Cream is a shining example of this transformative trend.
Ready to experience hydrated, glowing skin? Discover Kama Ayurveda’s Urjasara Water Cream—the future of luxe hydration is here.
In the world of skincare, the concept of barrier repair is becoming increasingly important. To put it simply, the skin barrier, also known as the stratum corneum (outermost layer of the epidermis), acts as a shield to protect the body from environmental stressors, bacteria, and dehydration. When this barrier is compromised, your skin becomes more susceptible to irritation, dryness, and premature ageing. Thankfully, Ayurveda offers a wealth of natural ingredients that can help restore and strengthen the skin barrier, providing long-lasting hydration and protection.
Ayurvedic Barrier Repair: The Foundation of Skin Health
According to Ayurvedic beauty, which is holistic in nature, your skin & hair are a barometer of your overall health. The health of your skin is closely linked to the balance of internal energies (doshas) which comes with leading a lifestyle that suits your doshas (Take the dosha quiz to find out your dosha) , maintaining a healthy, seasonal diet and the use of powerful plant-based skincare. The goal of Ayurvedic skincare is to harmonise the body and mind while supporting the skin’s natural healing processes. Ayurvedic barrier repair is not just about restoring the outer layer; it’s about nourishing the skin from within to ensure long-term strength and resilience. By incorporating ingredients like Urjasara Oil and and Urjasara Rich Cream (rich in Shala, and Phalini, Ceramides & other barrier repairing ingredients), these Ayurvedic ingredients help protect the skin barrier, improve texture, and prevent transepidermal water loss.
Signs of a Disrupted Skin Barrier
If your skin is showing any of the following signs, your barrier may be compromised:
Dry patches or rough texture
Redness or irritation
Increased sensitivity or inflammation
Breakouts or excessive oiliness
Tight, uncomfortable skin
Key Ingredients for Barrier Repair
Several Ayurvedic ingredients and bio actives stand out when it comes to barrier repair. Here's how they work to restore and strengthen your skin:
Shala
Known for its deep healing properties, Shala helps repair the skin's natural moisture barrier. It promotes hydration, reducing the appearance of dry patches and rough textures, ensuring a smooth, supple complexion. The nourishing qualities of Shala make it an ideal ingredient for replenishing moisture and protecting the skin from external aggressors.
Phalini
This Ayurvedic botanical is prized for its ability to balance the skin's natural oils, helping to strengthen the skin's barrier and prevent water loss. It works synergistically with other ingredients to support skin regeneration and rejuvenation, leaving the skin feeling softer, plumper, and more resilient.
Hyaluronic Acid
A staple in modern skincare, hyaluronic acid draws moisture into the skin, providing intense hydration and supporting the skin's ability to retain water. It helps plump the skin, improving texture and elasticity. At Kama Ayurveda, we use plant-based Hyaluronic Acid whose larger molecules helps lock hydration.
Find it in Kama Ayurveda’s Kumkumadi Silky Serum, Urjasara Milky Essence and Urjasara Water Cream
Amiporine™
This ingredient boosts moisture retention by supporting the skin’s natural hydration channels. It works with other barrier-boosting actives to prevent dehydration and maintain optimal moisture levels throughout the day.
Shea Butter
Rich in fatty acids and vitamins, Shea Butter helps nourish and repair the skin, enhancing moisture retention and creating a protective layer on the skin’s surface. It works as a natural barrier, preventing water loss while keeping the skin soft and smooth.
Danomega™ (Omega 3 & 6)
This potent combination of essential fatty acids is known for its ability to restore and strengthen the skin barrier. Omega 3 & 6 fatty acids support the skin’s natural repair mechanisms, reduce inflammation, and help improve overall skin texture.
Find Danomega™ (Omega 3 & 6) in Urjasara Water Cream & Urjasara Rich Cream.
Ceramides
Ceramides are essential lipids (fat molecules) found naturally in the skin that help maintain its protective barrier. They lock in moisture, preventing dehydration and protecting against environmental pollutants. When used in skincare, ceramides help restore the skin’s natural barrier, improving hydration and reducing signs of dryness, irritation, and sensitivity. They are especially beneficial for sensitive or dry skin types and help promote smooth, supple skin.
Find these moisturising locking ceramides III in Kumkumadi Night Balm & Urjasara Rich Cream.
Niacinamide (Vitamin B3)
Niacinamide is a powerhouse ingredient when it comes to improving the skin barrier. It helps reduce inflammation, boosts the production of ceramides, and strengthens the skin's natural defenses. Niacinamide also helps to enhance moisture retention, visibly reducing the appearance of fine lines, redness, and irritation. It is an excellent choice for people dealing with dry, compromised, or aging skin.
Squalane
Squalane is a lightweight, non-comedogenic oil that mimics the skin’s natural oils, helping to replenish the skin barrier and lock in moisture. It has a soothing, hydrating effect and is suitable for all skin types, even oily or acne-prone skin. Squalane helps maintain skin hydration, promotes elasticity, and supports the skin’s natural barrier function, making it an ideal ingredient for barrier repair.
Find it in Urjasara Rich Cream
Benefits of Urjasara: How Urjasara Supports Barrier Health
The Urjasara range is to nourish, hydrate and repair & strengthen skin’s natural barrier. Each product is thoughtfully crafted with a 35-Ayurvedic botanicals, blending time-honoured wisdom with modern scientific advancements.
Key components like Ceramides III work to restore the skin’s protective barrier, reducing trans-epidermal water loss and shielding against environmental stressors. Meanwhile, Amiporine™ Pomegranate Extract deeply moisturises and revitalises skin, ensuring 24-hour hydration. For that extra boost, Hyaluronic Acid delivers intense plumping hydration, leaving your skin feeling firm, supple, and thoroughly quenched.
The results speak for themselves:
+83% hydration from the very first use, offering long-lasting moisture.
+27% improved skin barrier repair after just one application.
After 4 weeks, 93% of users noticed more resilient skin, with 92% reporting a radiant glow.
94% experienced healthier, glowing skin that looks as good as it feels.
Urjasara’s sensorially luxurious textures melt effortlessly into your skin, making it a treat for all skin types. Encased in sustainable glass jars with a subtle floral fragrance, this collection offers a holistic, elevated skincare experience that supports both your skin and the planet.
Discover Urjasara Collection here
How to Maintain Your Skin Barrier
Maintaining a healthy skin barrier is essential for preventing moisture loss and protecting the skin from environmental stressors. Here are some tips:
Avoid Over-Washing: Excessive washing can disrupt the skin barrier. Cleanse your skin twice a day and avoid washing with hot water.
Use Gentle Skincare: Avoid harsh exfoliants or abrasive products that strip the skin of its natural oils. Choose gentle cleansers and moisturisers that support hydration and barrier repair.
Apply Moisturiser While Damp: To lock in moisture, always apply your moisturiser immediately after cleansing when your skin is still damp.
Use SPF Daily: Protect your skin from the sun’s harmful rays by applying a broad-spectrum sunscreen every day, even on cloudy days.
Dark spots or skin pigmentation is one of the most common worries in India. And that’s because we’re more susceptible to skin pigmentation since brown skin has more natural pigment or melanin than Caucasians. One of the most common signs of ageing, even-toned skin is the need of the hour. While the beauty industry is full of actives & laser treatments to brighten skin and reduce pigmentation, we’re going to take note of potent Ayurvedic formulations and ingredients that have stood the test of time and are equally effective in reducing skin pigmentation.
But first, let’s discuss the possible causes of skin pigmentation, Let’s get started.
What Causes Pigmentation?
You may have heard about a natural pigment called melanin that’s present in the skin. Each of us has the same number of cells that produce melanin known as melanocytes. Yet the amount of melanin these cells produce varies from person to person and determines our skin colour.
However, due to certain external and internal factors, there can be an increase in melanin production, leading to skin pigmentation on the face or body. These include
1. Sun exposure
Long term exposure to UV rays (UVA and UVB) without sunscreen can cause sun damage including dark spots, a common form of pigmentation.
2. Hormonal Imbalances
Internal changes in the body such as a change in hormone levels, or conditions such PCOS, thyroid, pregnancy can cause skin pigmentation.
3. Melasma
Melasma is a very common worry for expecting or new mothers due to hormonal changes in the body. Blue or grey-brown patches usually found on the face are commonly known as melasma. This is more common between the ages of 20-40.
4. Post-inflammatory pigmentation (PIH)
Leftover marks caused by pimples, acne or even eczema in some cases are referred to as post-inflammatory pigmentation or PIH.
Other common causes of pigmentation include side effects of certain medicines and skin irritation.
Types of skin pigmentation
1. Dark spots
These are also known as age spots, sunspots and Solar lentigines.
2. Melasma
Usually caused by genetic predisposition, Melasma shows up on the face as large brown patches during or after pregnancy.
3. Post-inflammatory pigmentation
Commonly known as PIH, it’s your skin’s response to an injury like acne, friction and more.
Can skin pigmentation be reversed?
There are many Ayurvedic formulations and skin pigmentation creams with a variety of ingredients that do help reduce pigmentation, with regular usage. With time, cosmetic treatments have also progressed leaps and bounds and offer many solutions to pigmentation.
However, today, we will be discussing Ayurvedic ingredients that can, in time, reduce pigmentation.
Can Ayurvedic treatments cure skin pigmentation?
In Ayurveda, it is believed that an imbalance of Pitta and Vata, can cause skin pigmentation. So, apart from using skin pigmentation creams & oils , which we discuss shortly, it is important to live a healthy, balanced lifestyle.
Tips To Treat & Avoid Skin Pigmentation
Plan your day keeping the circadian rhythms of your body: try to wake up early, meditate, eat healthy meals and sleep early.
Dehydrated skin is more prone to skin pigmentation. So, make sure you drink 8-10 glasses of water every day.
Make most of seasonal fruits, leafy green vegetables, legumes, and antioxidants that counter any free radical damage.
Avoid sun exposure as much as possible. When outdoors, make most physical blocks like dark-coloured clothing, sunglasses and hats to avoid sun exposure. Make sure you apply a broad-spectrum sunscreen that protects you from sun damage and dark spots.
Add a night cream that hydrates skin, reduces melanin production and imparts a natural glow will help you reduce hyperpigmentation.
Ayurvedic Treatments For Skin Pigmentation On Face & Body
Kama Ayurveda's NEW & IMPROVED Kumkumadi Youth-Revitalising Facial Oil is the complete age-defying facial oil to rejuvenate the skin and brighten complexion, enriched with the power of 600 rejuvenating Saffron flowers. Clinically proven to enhance 6 key youth indicators, this Kumkumadi Facial Oil delivers 6 visible skin benefits, offering a botanical, safe alternative to retinol for youthful, radiant skin.
Described as a natural skin illuminator in Ayurveda, Nalpamaradi Thailam is a miracle oil that brightens the complexion. With barks from four different species of Ficus trees, it also has ingredients like vetiver, turmeric and amla to help reduce pigmentation. Known for its detanning properties, Nalpamaradi Thailam can be used on the face and body.
Ayurvedic Herbs For Pigmentation Treatment At Home
Other than these ready-to-use oil blends, bookmark these three wonderful ayurvedic herbs and DIY skin packs for skin brightening:
1. Manjistha
This is an Ayurvedic herb that is a blood purifier and can treat the skin from within. It is believed to be an effective pitta pacifier. You can consume it in the form of a capsule (after consulting an Ayurvedic doctor) or make a face pack with manjistha powder with honey.
2. Turmeric
Make most of turmeric’s brightening properties by applying wild turmeric (also known as kasturi manjal) and mixing it with cow’s milk for a DIY face pack for skin pigmentation. It also gives your skin a healthy, natural glow.
Please note: Apply sunscreen while stepping outdoors when using turmeric in your beauty routine.
3. Liquorice
Liquorice contains liquiritin which is an active compound that disperses the existing melanin on skin. You can combine a tablespoon of liquorice powder with half a tablespoon of sandalwood powder with some raw milk to get an easy, homemade face pack that brightens skin. Use this thick pack twice a week for best results.
Can Ghee Be Used To Tackle Skin Pigmentation?
There are studies that suggest desi ghee is effective in treating skin pigmentation. Abundant in short-chain fatty acids and vitamins and antioxidants, ghee helps reduce oxidative stress and maintains healthy skin. This carotene also shields your skin from UV rays which are also known to cause pigmentation. While some of our products have ghee in it, you can also make your own DIY Face Pack. Here's how to use it: Combine 1-2 teaspoons of gram flour, amba haldi or kasturi manjal and a couple of drops of lemon juice. Mix it well and use it as a face pack to treat pigmentation on skin.
How to Use Liquorice Powder For Skin Pigmentation?
Here are some quick ways to use liquorice powder for different skin types:
For Oily skin: Take powdered orange peel with one tablespoon of liquorice powder and 5-6 drops of lemon juice. Mix it and use this paste for skin brightening for oily skin while also getting rid of excess oil.
For Dry skin: Mix honey and liquorice powder into a paste and use it as a hydrating face pack for dry skin that also helps brighten it.
For Normal skin: For normal skin, mix aloe vera gel and liquorice powder to make a soothing face pack that nourishes the skin and helps with skin brightening.
Home Remedies For Skin Pigmentation
Here are a few home remedies you can try for removing dark spots and dark patches:
1. Milk
Lactic acid is known to lighten patches and dark spots effectively. Soak a cotton pad in milk or yogurt and apply it over your face.
2. Apple Cider Vinegar
Simply apply apple cider vinegar mixed with water on your dark patches. Leave it for some time and wash it off. Acetic acid present in apple cider vinegar helps lighten skin pigmentation.
3. Red Onion
Take off the skin of the red onion and dry it naturally. Grind it into a powder and use it in combination with honey, or milk to apply it over your dark spots.
4. Tomato Juice
Rich in a substance called lycopene, tomato juice is proven to reverse the damage on skin caused by the sun. It is helpful to both apply it on your skin and make it a part of your diet.
5. Red lentils
Soak red lentils overnight and grind them into a paste in the morning with some water. Apply this paste as a face pack twice a week to get rid of pigmentation.
Foods to Avoid in Hyperpigmentation:
Avoid having foods that are excessively sour, salty, and spicy, instead consume bitter, astringent and sweet taste food.
Avoid consuming extremely hot or cold food. Eat your food at a warm temperature.
Never eat stale food, eat freshly cooked meals as much as possible.
So now you know every skin brightening treatment, DIY remedies as well as Ayurvedic products that can help in treating dark spots and hyperpigmentation. Start including them in your skincare regime NOW to get the results ASAP!